

lookforjoe
-
Posts
13,471 -
Joined
-
Last visited
-
Days Won
92
Content Type
Profiles
Forums
Gallery
Blogs
Downloads
Events
Store
Bug Tracker
Posts posted by lookforjoe
-
-
PVC elbows can be had from Home Depot for under a buck


..if you want to go that route. I prefer the NPT tap fittings..
-
240 is coming along! Those Calibre's look great! What do they weigh?
-
If you haven't had any issues it makes me curious if I'm having a different cooling issue. I assume the PN on the reservoir is common between MT/AT.
Reservoir is the same either way - I'm using the '99-on unit - and my system holds substantially more than stock with the full 3" core vs. stock 1.25" unit. I keep my reservoir about an inch below the full marker, and once hot, it is level at the full marker.
-
Until he responds - you can drill & tap the fibre housing - I used 3/8" NPT (drilled out to 5/8 ID) for my cam vent - you could easily tap it out to 1/2" NPT or larger & fit an elbow.I tried to put a S60R breather but it does not fit on the early models. How or what did you use to add the 1" vent? More pictures?

I use the same box - under a stock manifold you need the IPD phenolic spacer, and move the cam vent back as shown in my pic. Don't forget to buy the can vent hose also - it's a different shape since the port location does not match the old style- cam vent is rotated around to left side VS. Right side in old style
]


Instead of external cap for the old outlet, cut it down and tap & insert a plug (3/8 NPT), since that is the area where you will hit the manifold underside.
-
Read about your breather problem. I use S60R breather with 25mm (1") line to under the car. No crankcase pressure problems even on 660hp / 660nm / 2.5bar / 8000rpm rev limit.
Also i have oil restrictor on my holset hx40 which is 2.5mm (0.100"). Also use 1liter less oil in engine so oil level should be on halfway mark on you oil dipstick.
 Also revving only to 8000rpm is helping alot compared to 9000rpm...
Good to know 'm not the only one running under full oil capacity
Good idea to increase the box vent to 1".
I haven't had breather issues with my current build (25K miles now), however since I have the setup developed & working I didn't see any reason to remove it, even if it is fairly complex.
-
How did you hook up the slave cylinder?
The normal way...
All M66 are internal slave.
Makes no difference what clutch you use with that, offset is the same as the old external slave/Fork/ T/0 setup...
-
Nice Work!!!!!
Very sweet exhaust back pressure. Good to note you can make that power on one additional pump and under 10mm lines - means I won't be having any more fuel delivery problems on my setup
-
Did you have to put in a larger coolant overflow reservoir when you upgraded the rad? I'm starting to get overflow during hot soak with the larger capacity, and I assume the overflow is the same size for Manual/Auto.
What type of rad do you have? There is no reason a larger expansion tank would be required - there is no change in expansion rate of the coolant... I am using Evans Waterless since last August, but didn't see any increase in coolant expansion in the reservoir with the 3" core and standard coolant prior to that...
My wagon at Carlisle

On the way down


-
 3
3
-
-
Nice Work!
This came up for me a few days ago when an SS memebr pm'd me about the process - I still haven't touched mine either, and now with 175K miles, it's about time I started in ernest also. Don't want to wait until something breaks.
I have only collected the new track arms, the stay "bucket" bushings (as they were known for 240 series application) and the 700 caster rod bushes at the rear end of the stay - I bought these from IPD in poly form.
I would also prefer to get a good used rear suspension & strip & rebush that, rather than risk taking apart mine to find a problem (cracked/corroded subframe in bushing area, etc)....
Thanks for all the research!
PS - apparently the entire hardware was available in EU in kit form[ # 8628965 - it's shown in the diagram, but no PN is given, and the kit # I got from the SS member is not in the US parts distribution network....
-
One Provent should be more than sufficient with any Volvo family turbo setup, and stock rpm limit
-
Provent, they work great until the element gets saturated.
Geez, now you say something.
Lol. didn't see it earlier, however you should know better...
I agree that braising the water pipe was the best way to go, BTW...
-
Get rid of those standard hose clamps on the oil cooler hose - even old used Volvo clamps would be much better...
What kind of catch cans are those by the coil?
Provent, I'd say.
-
Check the wiring on the harness side for the cam sensor - maybe you have a flaky connection there. Seems odd that you would have so many sensors fail.
-
Cut the hood for the catches the past two afternoons. Finished up the install & drilled the mounting plate holes this evening. Holes are painted & trimmed, Catch has a thin bead of Volvo sealant under the lip.

remove underside catch

install pin w/bracket & check contact area in hood

align catch with fender/ hood seam

rough cut

check fit & catch operation

drill mount plate holes & paint. Use butyl to retain nuts in mount plate

installed

and done


-
3
-
-
I heard they were having one this year. I saw there was none last year, but the year before wasnt there one that required having to take the wheels off to dyno? Something weird I thought....
If there is one, I'll consider yanking the DS. The one the year before was Audi/VW only - it was one of those pita bolt to the hub jobs. He (the tuner) cooked a motor on it.
-
Nice!
So no dyno at Carlisle this year.
They haven't had a Dyno available the past two years anyway :(
-
Brackets are ready, now I 'just' have to cut up the hood...


-
The difficulty with the water pipe depends on the version - the later pipes with the longer water feed pipe to the oil cooler being the most difficult as there isn't much room to pivot the water pipe when working it into the water pump housing. Plenty of vaseline on the housing o-ring helps.
Working on Aerocatch latches - after looking at Trent's thread again
Latch will go about here - with outer edge closely aligned with fender line, which also closely aligns the inner edge with the hood ridge. Having the catch set so the centerline of the catch aligns with the hood/fender seam just looks wrong.

catch will be set so that opening for pin aligns with stock catch center - 6.5" front front edge, 3.25" in from fender edge


Since my battery is side mounted, I don't have the room to make hood pin brackets like Trents - so mine will be like this:

-
2
-
-
On 5/8/2014 at 10:09 AM, CHARGER69O1 said:
Dyno this year?
Once the fuel delivery mods are complete, I will be able to run over 21 psi boost without running out of volume, so, yes, I will be (AWD) dyno'ing to see what I'm making at 24psi (should be right around 500wheel), maybe higher if the tuning feels right.
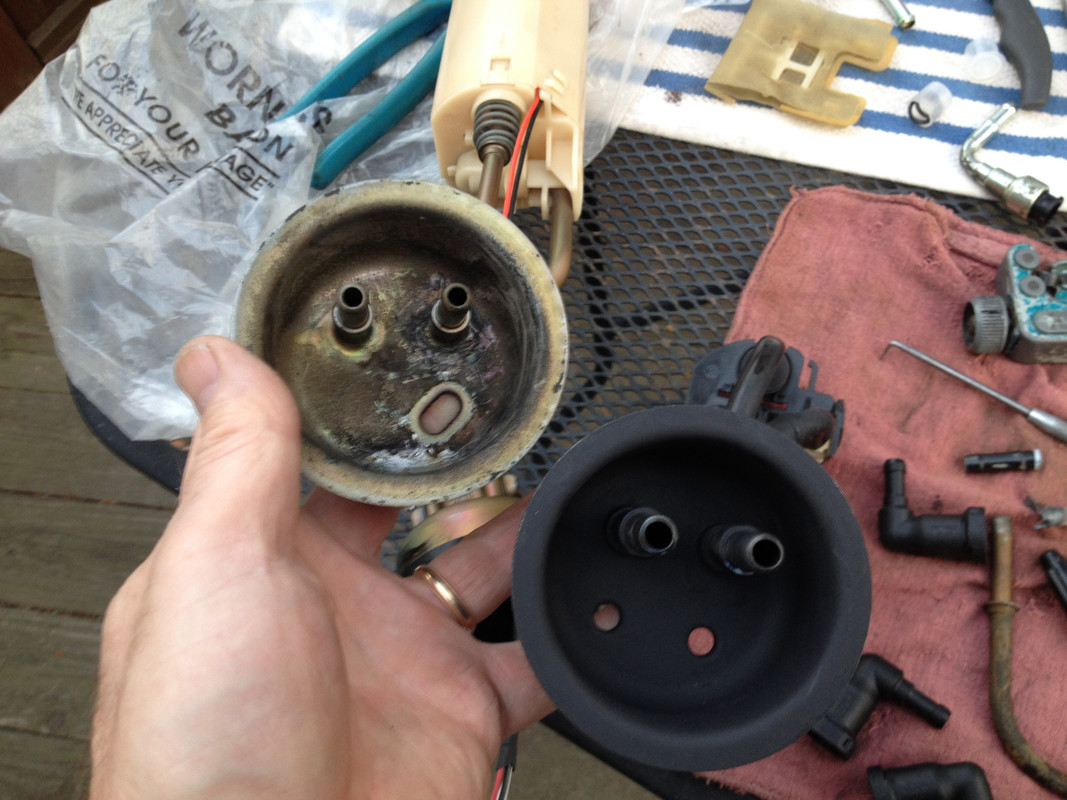
finishing up the sender unit lines & fittings upgrade to 3/8" from stock 5/16".
Not going to finalize install until after Carlisle, to avoid jinxing myself...
-
Taking a break from other stuff (installing modified LH2.2 in my X1/9 before the built motor goes back in)

Serpentine belt mod using some Volvo parts is complete, also. Beats the three standard v/belt setup

Fabricated the new 3/8" hard lines and quick connects for the sending unit going in. All fittings silver soldered. Was a pita to bend the 3/8 line without kinking, and to ensure the offset angle on the new one is near as dammit the same as the original, so it sits properly on the base of the gas tank floor

Stock lines I cut off & drilled out the pass through. The electrical junctions are a press fit, with a rubber seal and a stat washer to retain from the inside. Not hard to remove and reuse if suitable care is taken.

Next I have to replace the pass through 5/16" fittings for the ejector sender installed in the left saddle

-
2
-
-
Okay let me clarify my question, why chose to keep the internal pump and add the complexity and weight of the surge tank system/dual pumps at all? Wouldn't it be much more effective and simple to get rid of the internal gas pump, modify the tank for a bottom pickup and put on a single highflow external pump with new larger lines all the way to the engine? There're single pumps that can run 1200HP supercharged V8s...i'm sure they can handle your 500HP.
That's not to say your system won't work, it will, I just don't get the complexity when such a more simple solution exists.
Yeah. Problem is you keep talking in generalities. If you had any knowledge of the AWD layout, and it's impact on fuel system layout and design, you would have a better understanding of the path I chose.
Lets just start with this:

Saddle tank; requires feeder from left to right. Tank itself cannot be "modified". I have chosen the easier, softer way.
Of course I didn't need dual pumps or a surge tank, as stated, I don't want to go over this again. Running lines is a royal PITA. If you have no concept of the layout, the above pic should help.
The entire rear suspension sits in between and around that tank, along with the fact that the whole setup is set very close to the floor pan/tub.

-
1
-
-
I guess I just don't understand why you need all this fancy fuel stuff, tons of engines make your sort of power without it. Why can't you just modify the tank and put in a big Aeromotive external system? Sure seems like it would be easier/less weight/better all round.
"tons of engines may make my sort of power" without "fancy fuel stuff" - yeah, that's about as vague and general a statement as you can get

I guess you didn't look at earlier posts. With 5/16" fuel lines, the system cannot provide sufficient volume at higher load/inj duty cycle. @ 445AWHP, 21psi with 750cc injectors maxed out over 90% duty cycle, the fuel pressure has dropped significantly.
In order to make a safe 500+AWHP, I need much more volume than the stock lines or the DW300 single in tank pump can provide. I only need to run another 3psi to make 500AWHP, and at that level, my 6262bb will be barely breaking a sweat, right now it's not even jogging
 - so more headroom is always a good thing.
Since the AWD fuel system is more finicky than FWD, there is no point doing this half ass. Hence the dual pumps in a surge tank, 12mm feed & returns, etc.
-
1
-
-
I guess my concern with buying before opening was that if you buy 139.5mm rods, you are stuck with them if your block is toast. I can only assume that there are differences in crank counterweights/clearances/etc if one were to try and fit shorter rods to a block that may be equipped with longer ones. Also throw in differing wrist pin diameters, etc. Perhaps it's not an issue. IDK.... I just know that my preference would be to buy parts based on the particular engine that I am committed to rebuilding.
Cranks are the same spec between the 139.5 & 147mm rods. The weight is different due to the revised counterweights. In other words, it makes no difference which rod/piston combo you use with either crank designed for those rod/piston combos. 143mm rod/piston/crank setup is another story.
-
2
-
-
Looks nice. Does your shaft have enough free length to accommodate the height differential? The Garrett 60-1 wheel I used in my 20g barely had room to lock the nut down

Hussein's 1998 V70 Xr : The Force Awakens
in Performance Modifications
Posted
If you have a N block - it has no windows between the cylinders, and with a stock box you are more likely to develop positive pressure. If you are VTA, using stock size outlets, it's just too small. The larger box helps, and having an outlet of 1" (2x stock) should allow for unrestricted blowby passage.