

Oreo931
-
Posts
27,447 -
Joined
-
Last visited
-
Days Won
92
Content Type
Profiles
Forums
Gallery
Blogs
Downloads
Events
Store
Bug Tracker
Posts posted by Oreo931
-
-
16 hours ago, gdog said:
Maybe a couple of ounces?
15 hours ago, Brad850 said:Completely negligible. Buy two boxes of the stuff and you'll quickly realize it's nothing to worry about.
Agreed.
-
9 hours ago, AJp80 said:
Thanks for the write-up @Oreo931. Do you still have the photos for this somewhere? I'm about to repair my dash, and the photos would be useful.
The pics are still there. I don't have the time to rehost them. You can get around the photobucket block by installing a plugin on chrome. I use this one: https://chrome.google.com/webstore/detail/photobucket-hotlink-fix/kegnjbncdcliihbemealioapbifiaedg?hl=en
Alternatively, you can view the entire album of dash repair pics here: http://s104.photobucket.com/user/iamawass/library/Dash Repair
-
 2
2
-
-
8 hours ago, Blockpartie said:
Photobucket has a adopted a new business model. The monkey YOU-business model, as pioneered by Comcast.
The tl;dr is: pay $399 per year so that pictures can be linked ('3rd party hosting')
I don't know what they are thinking. Their service is not worth that much money, nobody will spend this much money to link pictures in some thread on some forum, competitors are asking less for the same service. It has broken, so to speak, informative forum posts all over the internet. Many threads on VS included.
Request to the mods: May I be permitted one (1) swear word for this post please?
They fucked up all of the writeups i posted on VS and other forums. I am pissed. It's going to take a long time for me to move everything over to flickr.
-
1
-
-
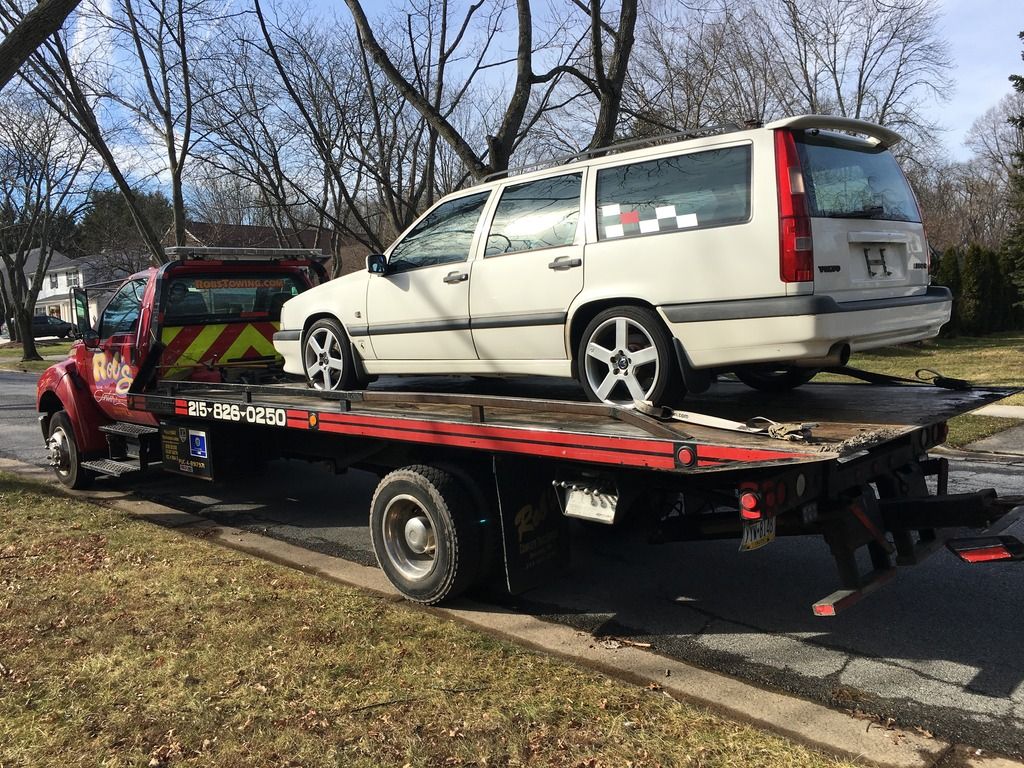
Inside joke. Many years ago I had the company that picked up this wagon, Rob's Towing, paint an R bumper for my yellow car. Josh had recommended the shop to me, and the office manager was this burly lady named Adourna. The shop ended up having to repaint the bumper a total of 3 times because each time the job wasn't done right. When I picked it up the first time, the bumper had cracks in the paint, so they repainted it a second time. Then, the paint started cracking like two weeks after I installed the bumper. So they repainted it a third time. A few months after that....you guessed it, the paint cracked again. I gave up at that point.
-
1
-
-
30 minutes ago, JoshV70 said:
Did Adourna pick your car up?
Yes. Then she walked into my garage and kicked the R bumper on my yellow, cracking the paint.
-
1
-
-
3 hours ago, 7 VII 7 said:
What happened to your yellow 854R?
Parked in my garage :)
-
13 minutes ago, gmsgltr said:
Adam came out...
I bought another VW...

Can you believe Dave has 2 kids now? Crazy. I've got one too.
I sold my wagon last week. Getting shipped to FL.
-
-
Thanks all! Hope it goes to a Volvo enthusiast. Only listed on VS and SS right now until I take better pics.
-
38 minutes ago, BlackT5 said:
Beautiful car. GLWS Adam.
What's the new DD?
Thanks! Just bought the new DD last night. 2014 VW Jetta GLI Edition 30.
-
1
-
-
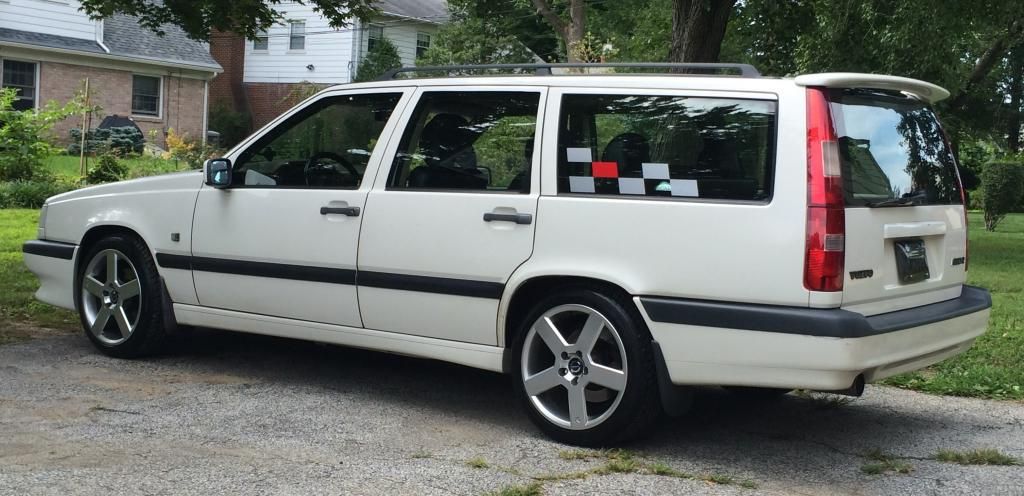
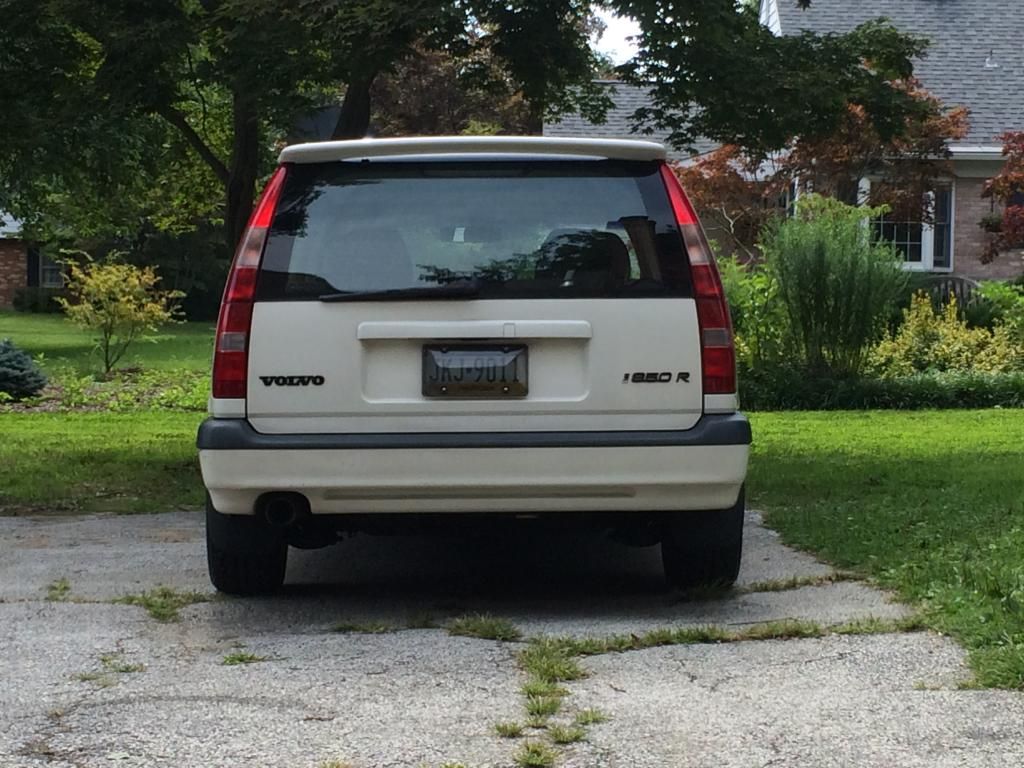
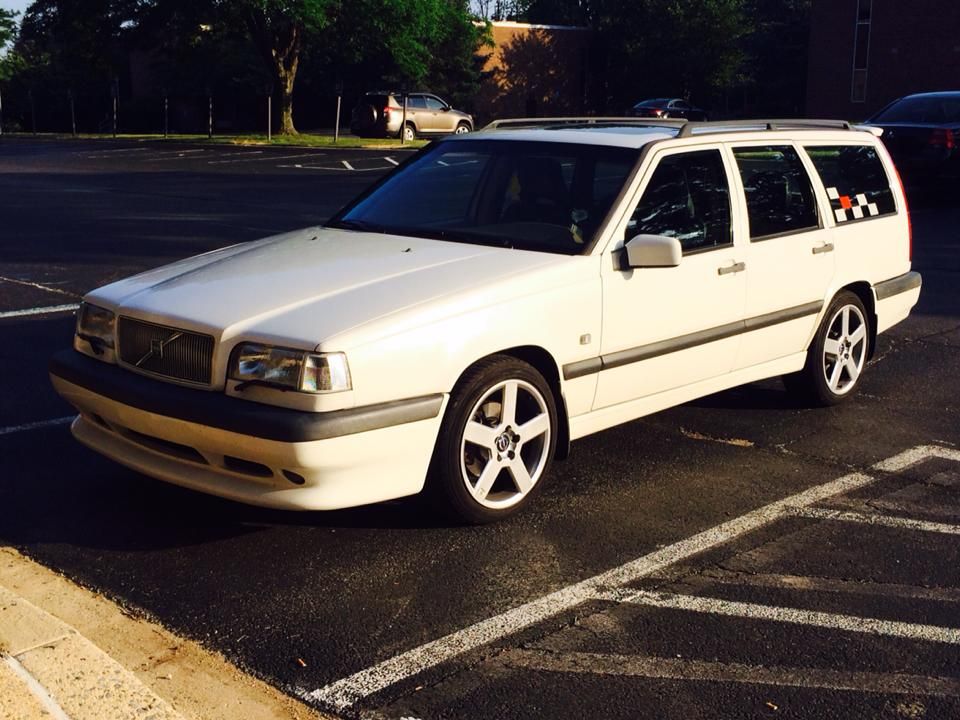
For sale is my 1997 850R Wagon. White exterior, black interior, 145k miles. I am selling this car because I bought a new daily driver. If I did not already have an 850 T5R project car, I would be keeping this one given its rarity and condition.
I am the second owner. I purchased the car from the original owner in 2013 with 104k miles. Clean carfax, no accidents. Carfax shows regular servicing at a local Volvo dealer from new until my ownership. The car was garaged by the original owner, and garaged for 90% of my ownership.
The car is stock, aside from a strut bar and a few cosmetic upgrades (sidemarkers, e-code headlight lenses and turn signals, euro wide angle mirrors, HIDs, V70 tail lights, V70 3rd brake light, Pegs, T5-R steering wheel). The seats in the car are from a lower mileage 1998 V70R. I did a charcoal interior swap and prefer the V70R seats because they look cooler and are more comfortable IMO. All power and heated seat functions work as they should. Oil changed every 3k-4k miles with an OEM filter.
Below is an extensive list of everything that has been done to the car since my ownership. All parts used are new OEM Volvo parts unless otherwise indicated. I maintain this car religiously. Of particular note, at 112k the PCV, timing belt, water pump and pulleys were replaced, and at 128k the valve stem seals and RMS were replaced by a Volvo master tech. The underside of the dashboard and mounting tabs are fully rebuilt and reinforced with fiberglass. See my writeup for more details: http://volvospeed.com/vs_forum/topic/171818-diy-850-dashboard-repair/. The dashboard is silent.
This car is an extremely rare find in this color combination and condition. 850s are becoming extremely difficult to find with lower mileage and in good condition, and even more so for T5R/R models. The car is located in Wilmington, DE, 20 mins from the Philly international airport for non-local buyers. The price is $6,000.00.
I'll take some updated pictures once I clean the car properly. Here are some older pics in the meantime: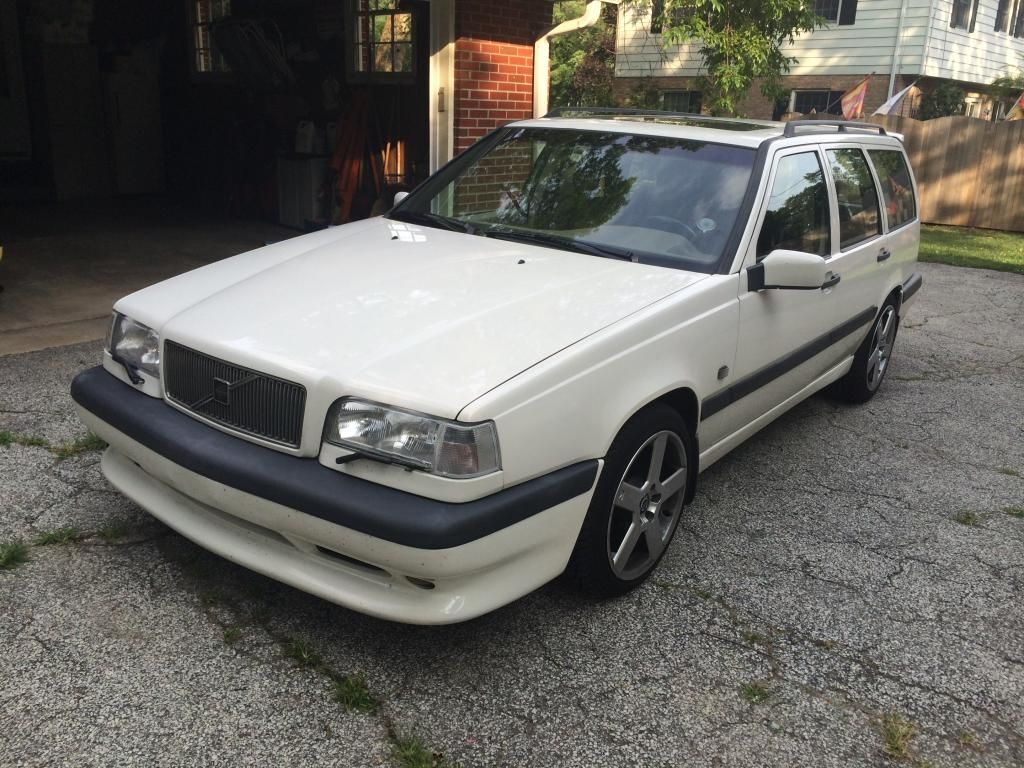
OEM Rear Spoiler (used) - 106k
OEM Spoiler Mounting Kit - 106k
OBX Strut Bar - 106k
Oil Change - Castrol 10w30 w/ OEM Filter - 107k
OEM Sachs Front Struts (x2) - 110k
OEM Spring Seats (x2) - 110k
OEM Strut Mounts (x2) - 110k
OEM Endlinks (x2) - 110k
Bump Stops (x2) - 110k
OEM Strut Bolts (x4) - 110k
OEM Outer Tie Rod (right) - 110k
Alignment, Tires Balanced - 110k
850 Euro Rails (used) - 110k
OEM Euro Rail Trim Kit - 110k
OEM Front Wiper Blade Kit - 110k
DDM HID Kit 4500k - 110k
E-code headlight lenses - 110k
OEM PCV Kit - 112k
OEM Timing Belt/Water Pump/Pulleys/Tensioner/Serp Belt - 112k
OEM Lower Transmission Mount - 112k
OEM Pegasus Wheels 17x8 (x4) - 112.2k
General G-MAX AS-03 Tires 215/45/17 (+road hazard) (x4) - 112k
OEM Oil Cooler Lines (upper + lower) - 113k
Oil Change - Castrol 10w30 + OEM Filter - 113k
OEM Lift Gate Striker (on bottom of latch) - 113k
Replaced Interior Switch Bulbs - 113k
V70 Rear Upper Tail Lights (used) - 115k
Clear Sidemarkers - 115k
OEM Motorsports Badge - 115k
Oil Change - Castrol 10w30 w/ OEM Filter - 116.7k
Tires Rotated - 116.7k
E-code turn signals (Depo) - 117k
OEM E-code bulb holders (for turn signals) - 117k
OEM Tailgate Struts (x2) - 117k
V70 3rd Brake Light (used) - 117k
V70 3rd Brake Light Relay (used) - 117k
Sound deadening installed on all doors - 117k
OEM Front Brake Hoses - 120k
OEM Rear Brake Pads - 120k
ATE Rear Brake Rotors - 120k
Brake Fluid Flush - 120k
Oil Change - Castrol 10w30 + OEM Filter - 120k
Tires Rotated - 120k
OEM Turn Signal Stalk - 120k
Rear Armrest w/ Cupholders (used) - 123k
Homelink Visor (used) - 123k
Oil Change - Castrol 10w30 + OEM Filter - 123k
OEM V70R Floor Mats - 124k
OEM Inner Tie Rods (x2) - 124k
OEM Outer Tie Rod (left) - 124k
Alignment - 124k
OEM Spark Plugs - 125k
Bosch Fuel Filter - 125k
Heater Core (new improved aftermarket) - 125k
OEM Heater Core O-rings - 125k
OEM Exhaust Hanger Hook (and repair kit) - 125k
Dynomax SS Exhaust Tip 4" - 125k
OEM Radiator - 126k
OEM Rad Upper Hose - 126k
OEM Rad Lower Hose - 126k
OEM Thermostat - 126k
OEM Thermostat Bolts - 126k
OEM Coolant Temp Sensor - 126k
OEM Reservoir Hose (Upper) - 126k
Coolant Flush (Volvo Coolant) - 126k
Tires Rotated - 127.5k
OEM Distributor Cap - 127.7k
OEM Distributor Rotor - 127.7k
OEM Spark Plug Wires - 127.7k
OEM Rear Cam Seal (behind cam sensor) - 127.7k
Tki Motorsport - Engine Overhaul: 128.8k
---OEM Valve Seals
---OEM RMS
---OEM Lower Front Engine Mount (under crank)
---OEM Turbo Inlet Cooling Hose
---OEM Cam Seals (x4)
---Oil Change - OEM Oil and OEM Filter
---Transmission Oil Replaced OEM Fluid (7 qts)
---OEM Fuel Neck Clamps (upper and lower)
---Coolant Flush (Volvo Coolant)
---OEM Oil Pump Gasket Kit
Oil Change - Castrol 10w30 + OEM Filter - 131k
OEM Front Brake Pads - 134k
ATE Front Brake Rotors - 134k
OEM Rear Brake Pads - 134k
Brembo Rear Brake Rotors - 134k
Oil Change - Castrol 10w30 + OEM Filter - 135k
OEM Starter Motor - 137k
OEM Front Wiper Blade Kit - 138.5k
Oil Change - Castrol 10w30 + OEM Filter - 139k
Tires Rotated - 139k
Bosch O2 Sensor (front) - 140.5k
OEM Battery - 141.5k
Complete rebuild of dashboard and mounting tabs - 141.5k
Auto-Down Passenger Window Relay - 141.5k
ABS Module Rebuilt (Midwest ABS) - 141.7k
Oil Change - Castrol 10w40 + OEM Filter - 142.5k
OEM Euro Wide Angle Mirrors (used) - 144k
OEM Control Arms (x2) - 144k
Bosch Icon Wiper Blades - 145k-
2
-
-
17 hours ago, mattsk8 said:
You'll be back. I tried but can't refine myself to a boring, everyday car. I haven't tried a VW though, that might be the answer... Why not a newer Volvo?
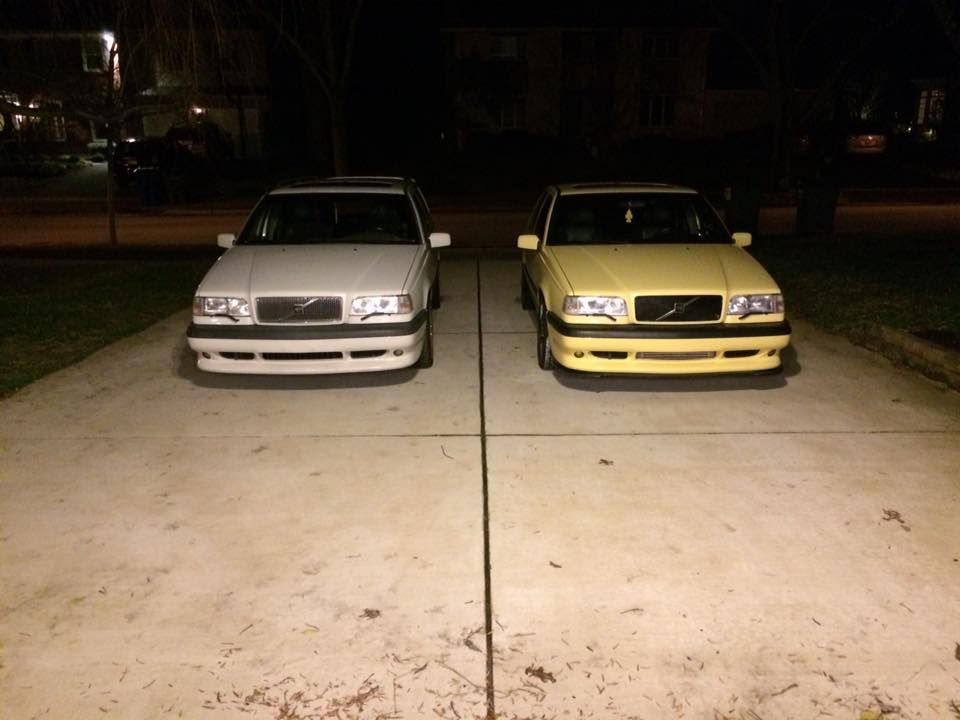
The 855R is my daily. I just want something newer to DD. I am still keeping my 95 850 T5-R. I plan to hold on to that car for a long, long time. I've owned it for 8+ years now.
As far as staying away from boring, every day cars, I agree. That's why I am looking for a GLI. It's a jetta on steroids. Kind of like comparing an 850 n/a to an 850R.
I thought about a C30, but it's just not practical with a newborn. I need to be able to carry a car seat + stroller. I also want something 2011 or newer, and the newer volvos are either out of my price range or too boring.
-
1
-
-
18 minutes ago, gmsgltr said:
$17.99 for the wagon? Free two day shipping?
Free delivery!
-
1
-
-
I'm going to be selling my 855R soon. Tired of driving a 20 year old car every day. Buying a used 2012+ VW Jetta GLI as a replacement DD.
-
1
-
-
Nice! What porsche did those calipers come from? And did you make the brackets yourself?
-
2 hours ago, gmsgltr said:
Timo - it will take more than 5 minutes. We all know that. Everybody always says... "it took me only 5 minutes to do that"
Do it right if you ever expect someone to see any of it in your bay. Take out your current one, clean it very well. Get your dikes out and safety glasses and start cutting it up. Sand down the sharp edges and then spray it off again and THEN you are done. I agree with the others - its a waste of time pulling one from the JY though...
you're a dike
-
1
-
 1
1
-
-
2 hours ago, Burn-E said:
Assuming you used Rustoleum Stops Rust Textured Black paint from a spray can it contains 50% acetone and that would have directly attacked the methyl methylacrylate that is the monomer used to fuse the powder in Plast-Aid. That's my theory at least.
Well shiiiiit.
I see you're still living up to your member title.
-
1
-
-
6 minutes ago, apeacock said:
Solid write up. I don't think i saw where you got the fiberglass materials though. Any suggestions?
Any basic fiberglass repair kit will work. Your local auto parts store should have them. Here's what I used:
http://www.amazon.com/3M-Fiberglass-Resin-Repair-Quart/dp/B000BO7CVK?tag=viglink22560-20
I went through nearly two of the 7.2oz kits, so I would suggest buying the 28.8oz kit pictured below.
You can also use carbon fiber cloth instead of the fiberglass mat if you want to be extra cool


-
94+ 850s should have the same dashboard structure and mounting points. The condition of a dash depends on a number of factors, such as the roads on which the car was driven, the condition and maintenance of suspension components, the climate/temperature where the car lived, whether the car was garaged, etc.
These dashboards are actually quite easy to remove. There are four 10mm bolts on the firewall under the wiper cowl, and four t25 torx screws in the cabin. You'll also have to remove the steering wheel + airbag (two t30 torx, one 18mm bolt), steering wheel cover (four torx screws), and turn signal and wiper levers.
If you want to remove it in pieces (which I recommend if you are removing for purposes of repair/reinforcement), then it takes a bit longer since you have to take off the dash pad.
There are tons of write ups online showing how its done. For first timers, I would estimate 3-4 hours to remove everything. I can do it in much less time since I've had the "pleasure" of repairing so many of these. I think I pulled an entire dash from the junkyard in ~30 minutes. If you want to save the dash you are removing, I would suggest taking your time. You are working with plastic that's 20+ years old. It can be VERY brittle.
-
3
-
-
3 hours ago, survolvo said:
Good write up. I might have to do this sometime if I ever get the urge to work on the car again.
I also have your address now.

Lol. That's my parents' address. Good eye.
-
1
-
-
- Popular Post
- Popular Post
Over the years I’ve repaired and/or replaced at least 5 dashboards in 850s. I’ve used a number of repair techniques and by trial and error have found that only one type of repair is a permanent solution. This thread contains a discussion of the various repair methods and a short write up of the best solution: fiberglass. This write up can also be used for x70 dashboards since they are so similar to 850s.
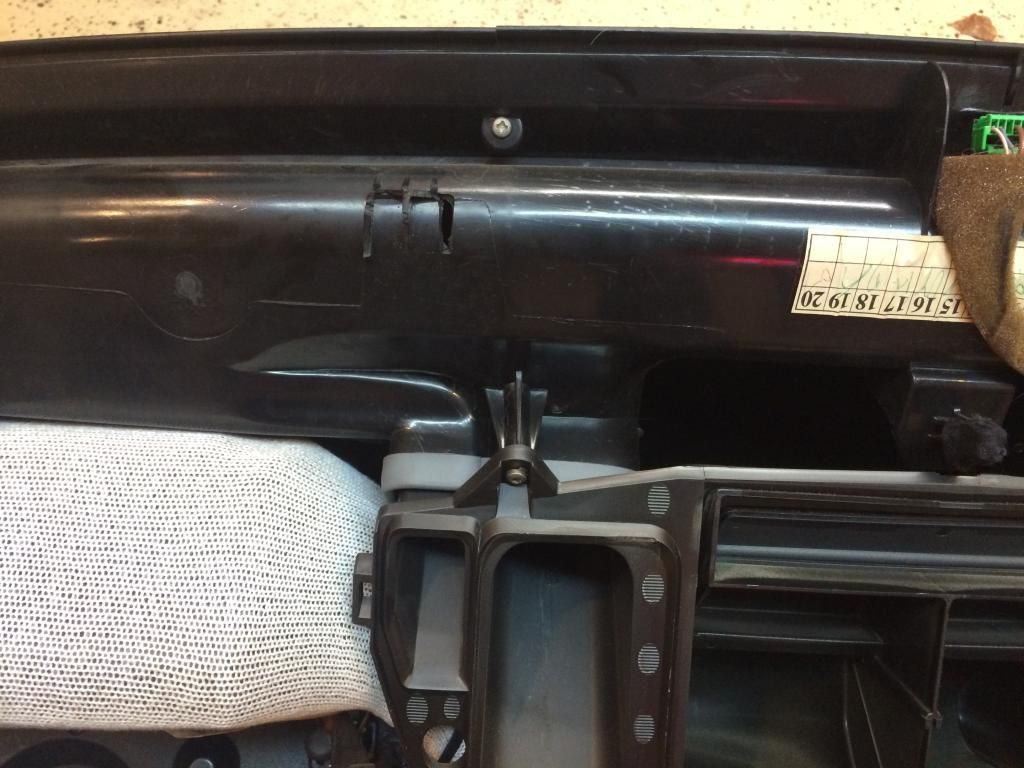
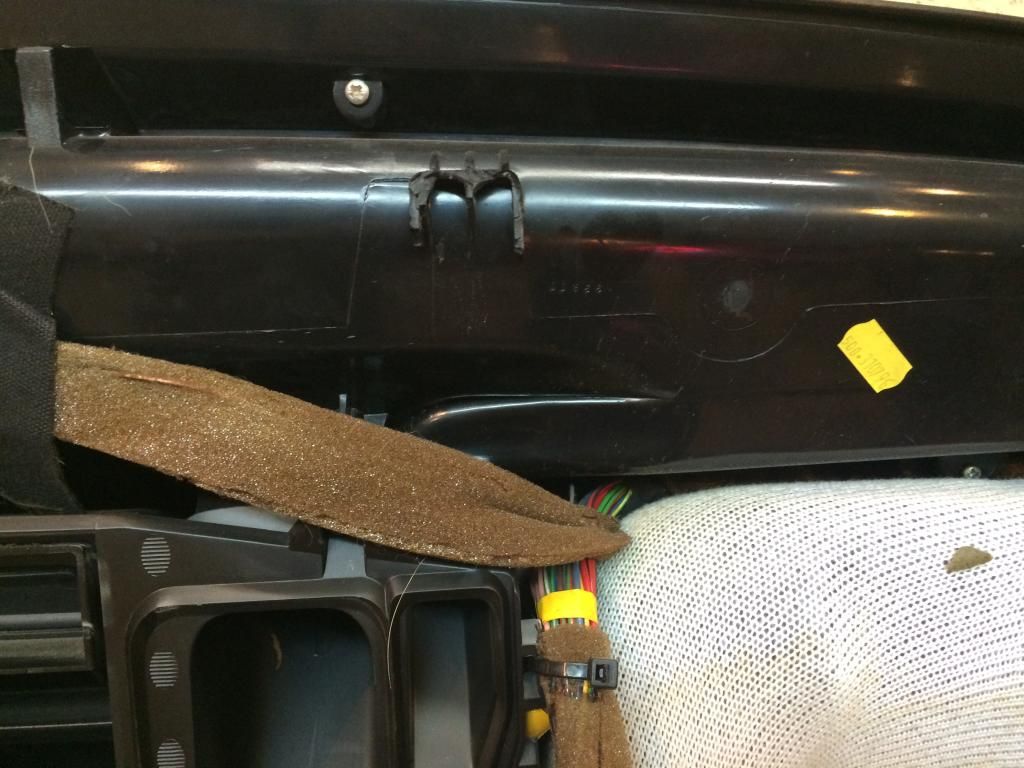
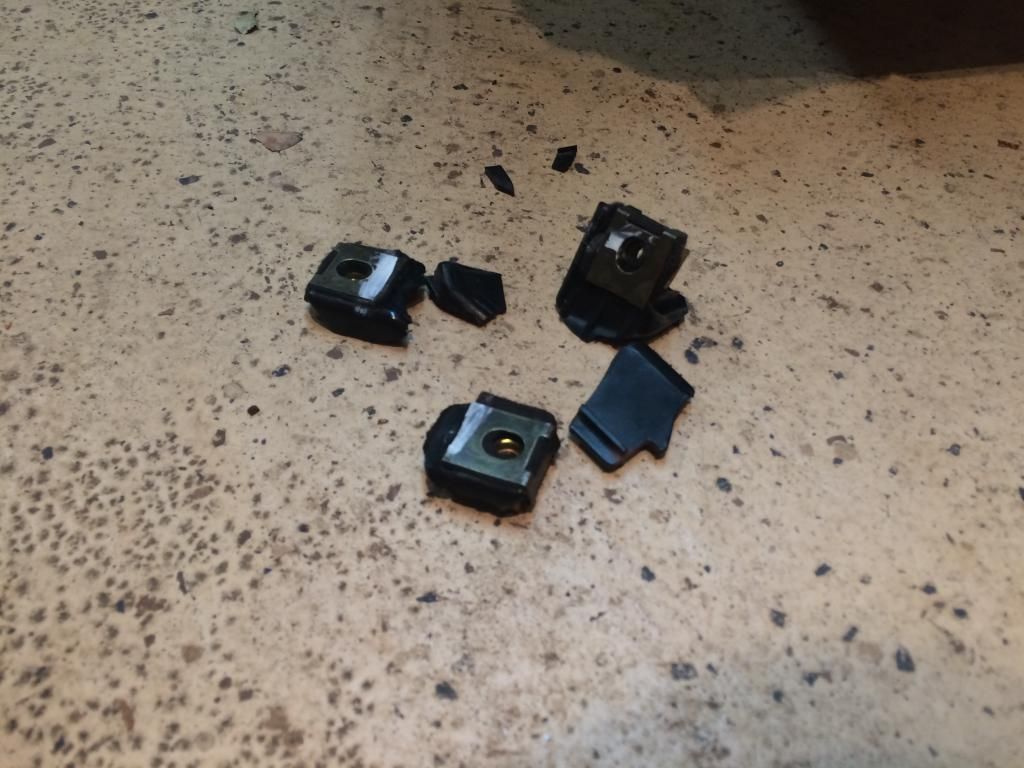
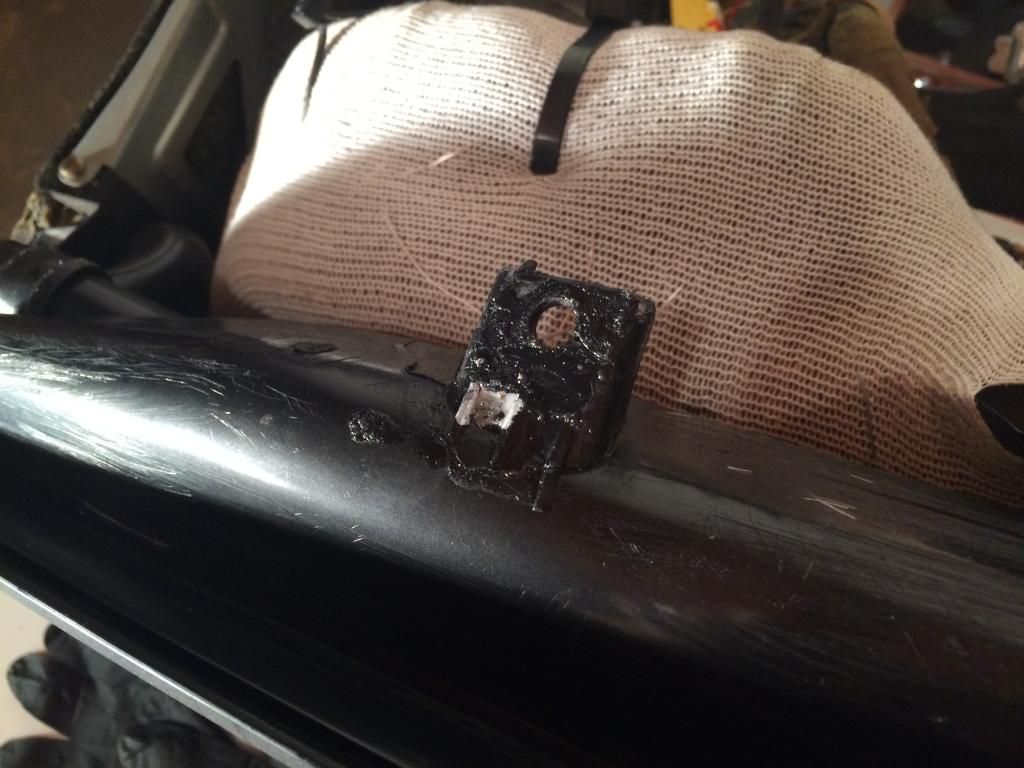
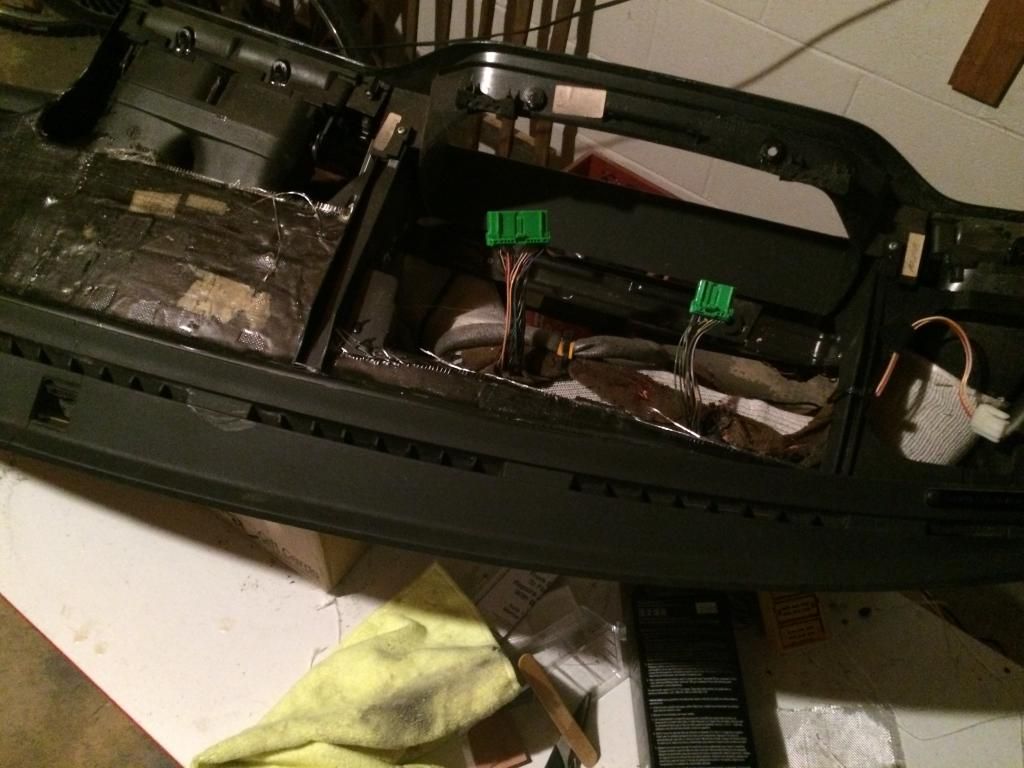
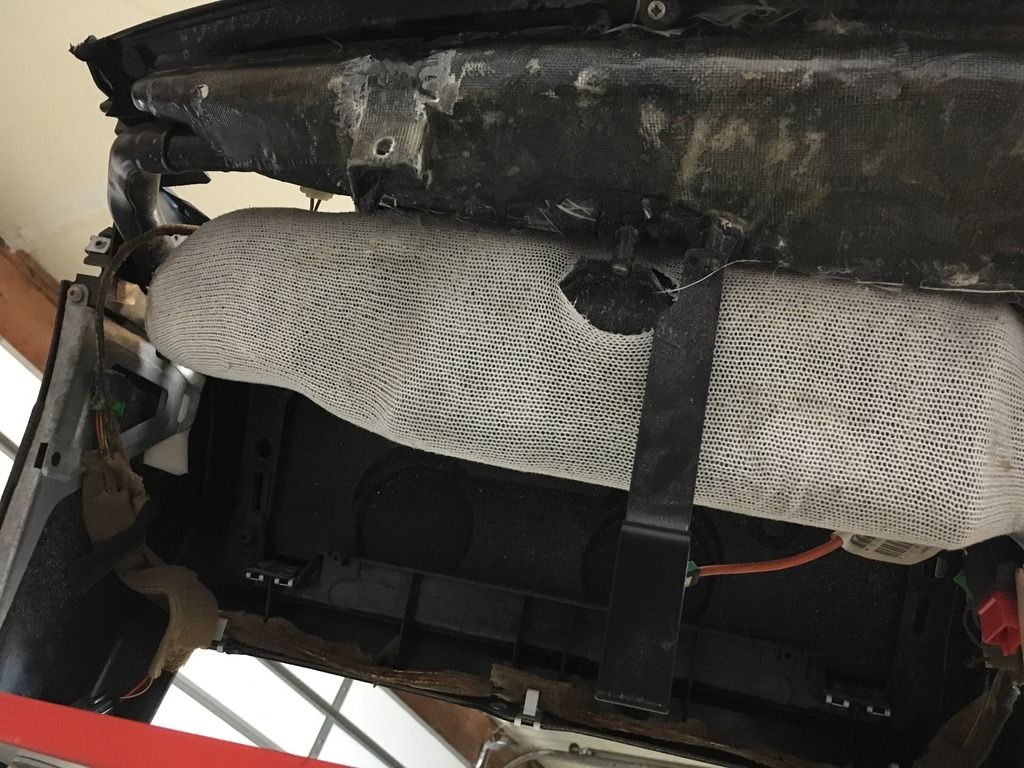
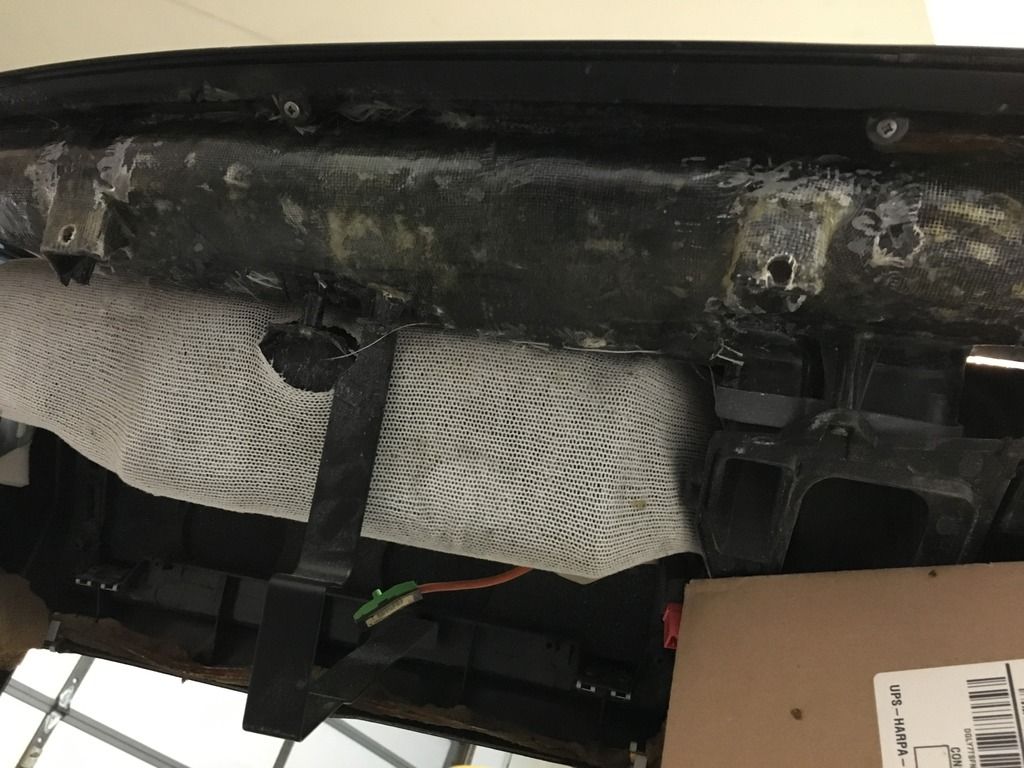
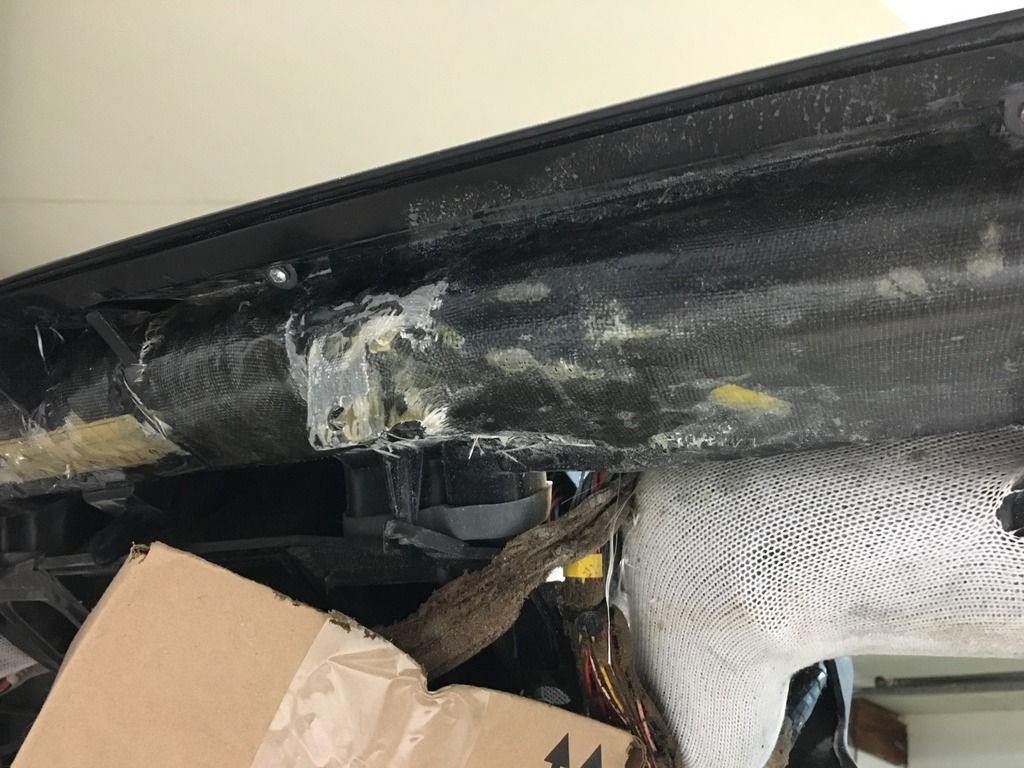
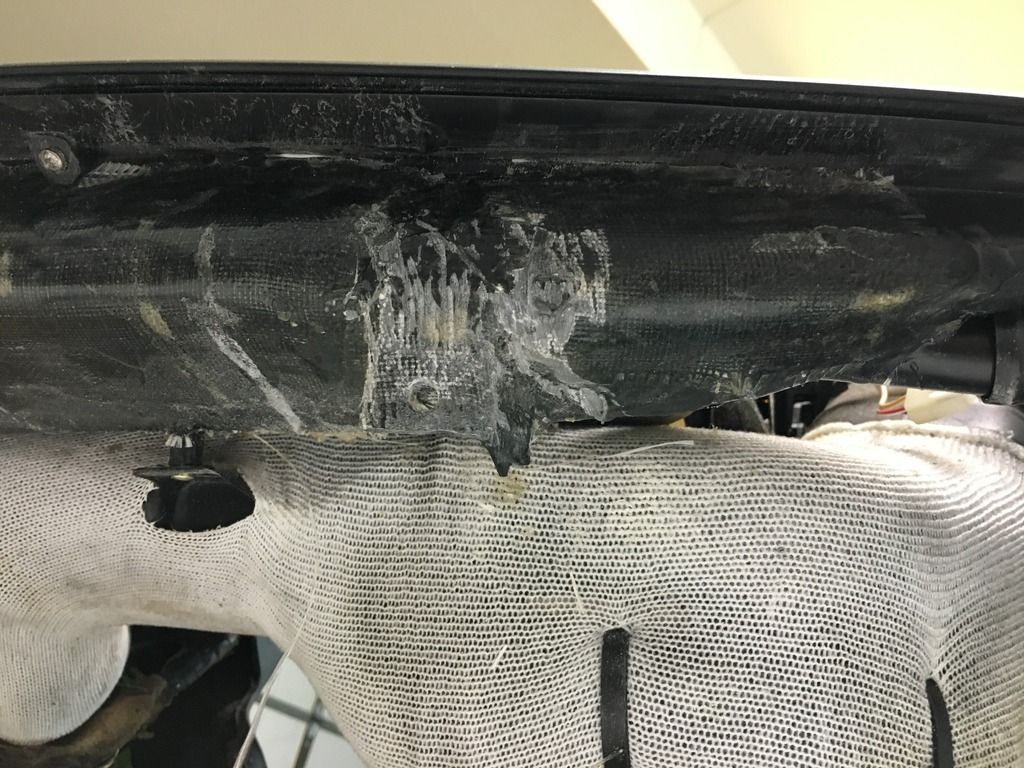
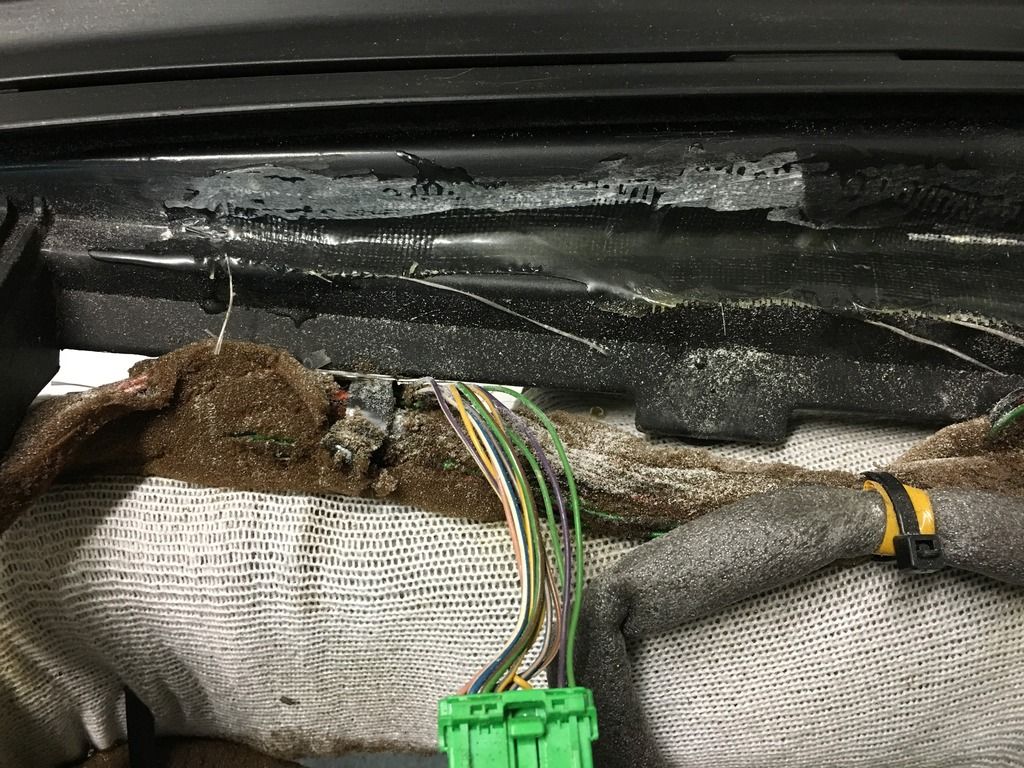
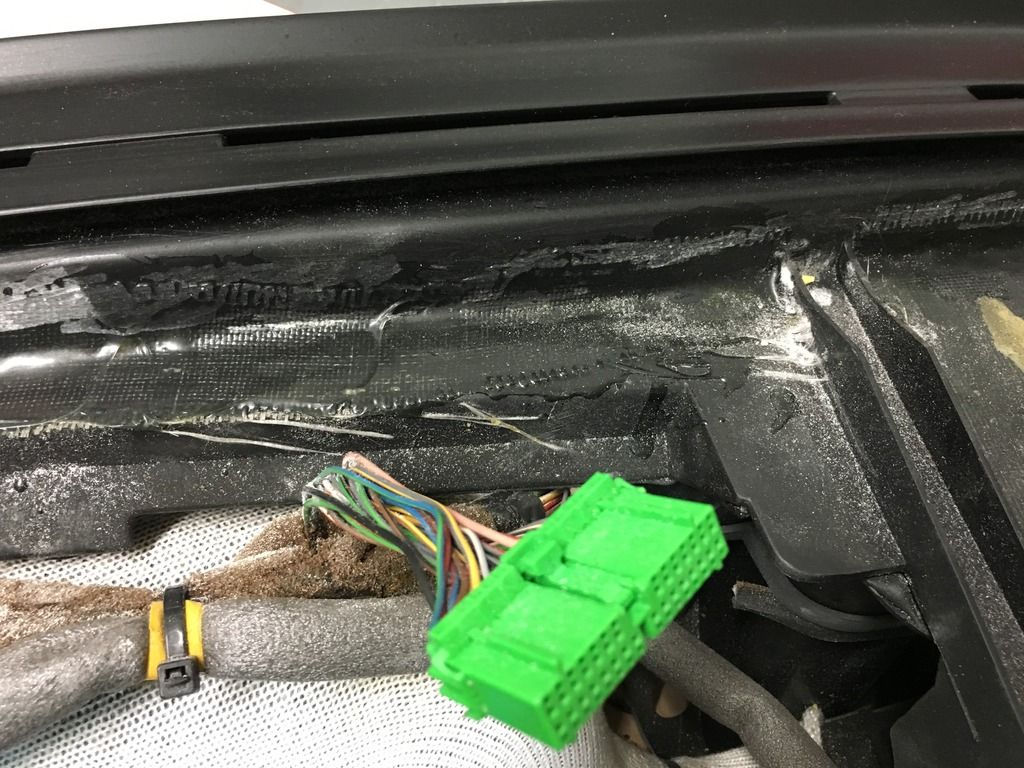
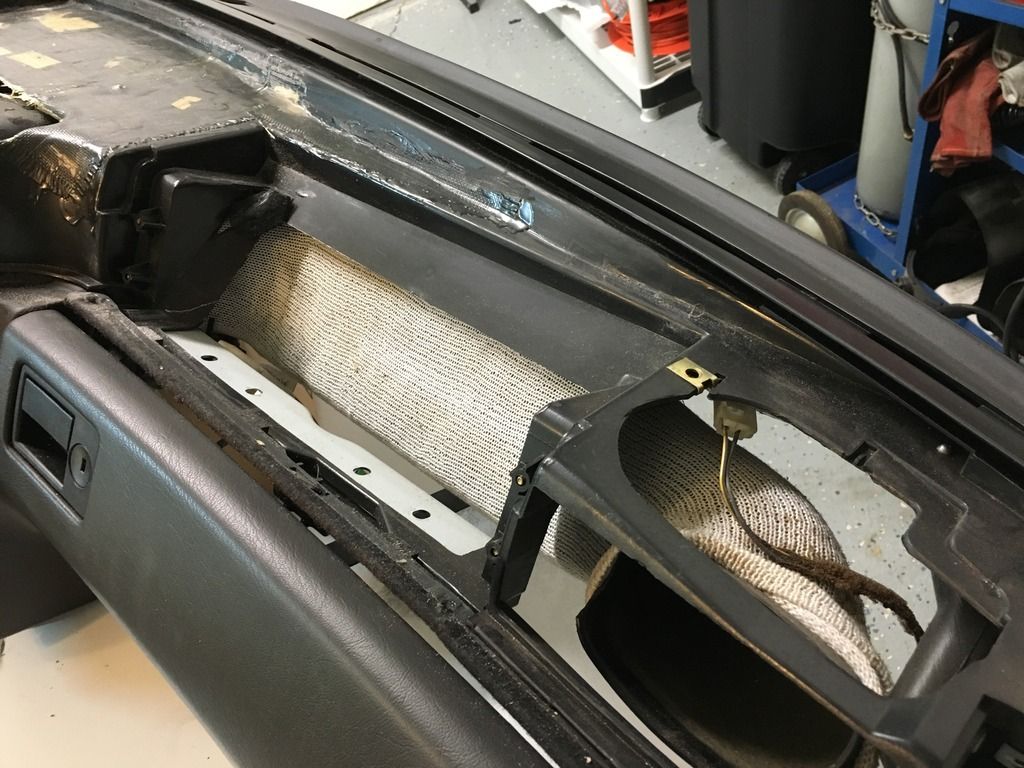
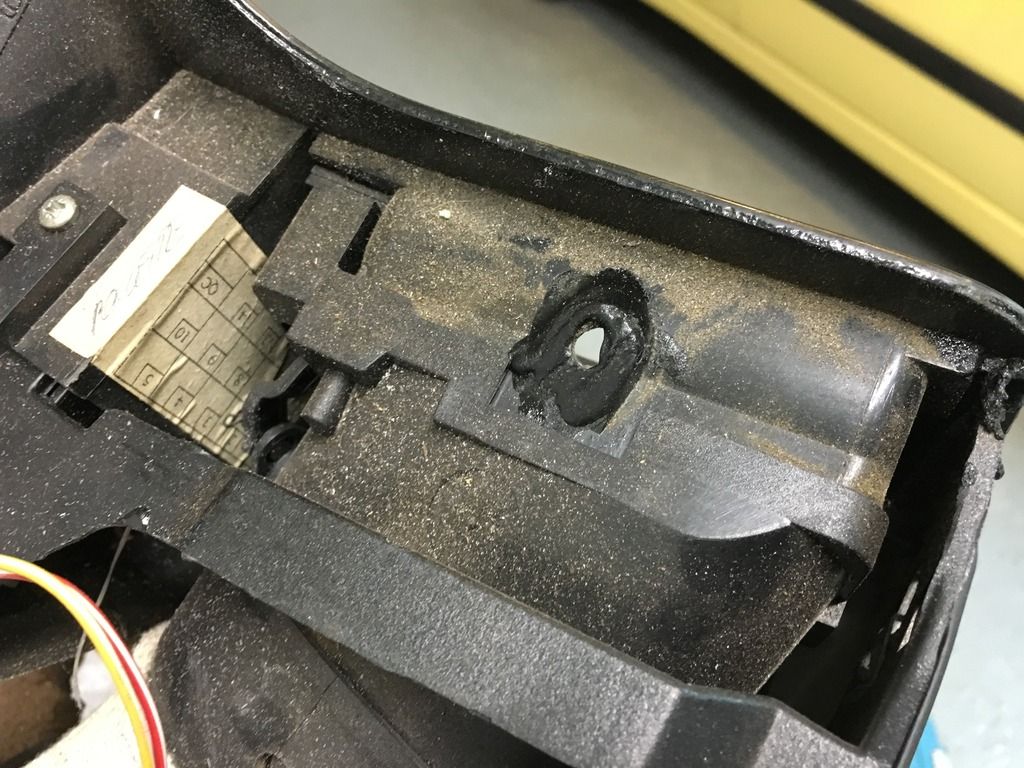
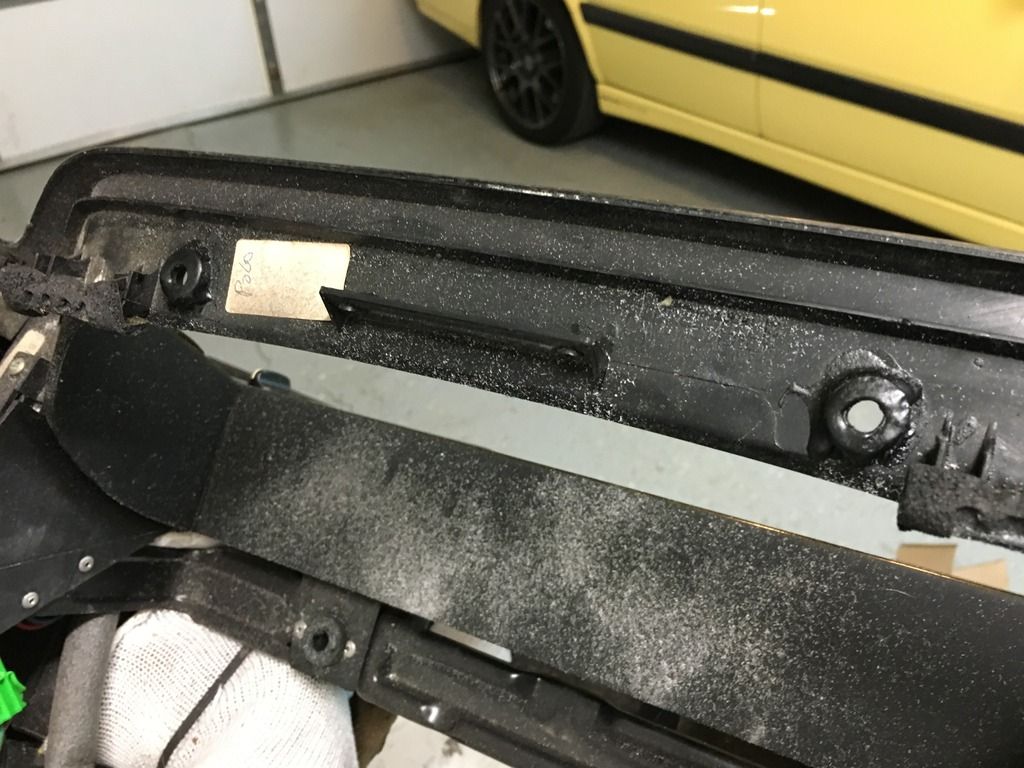
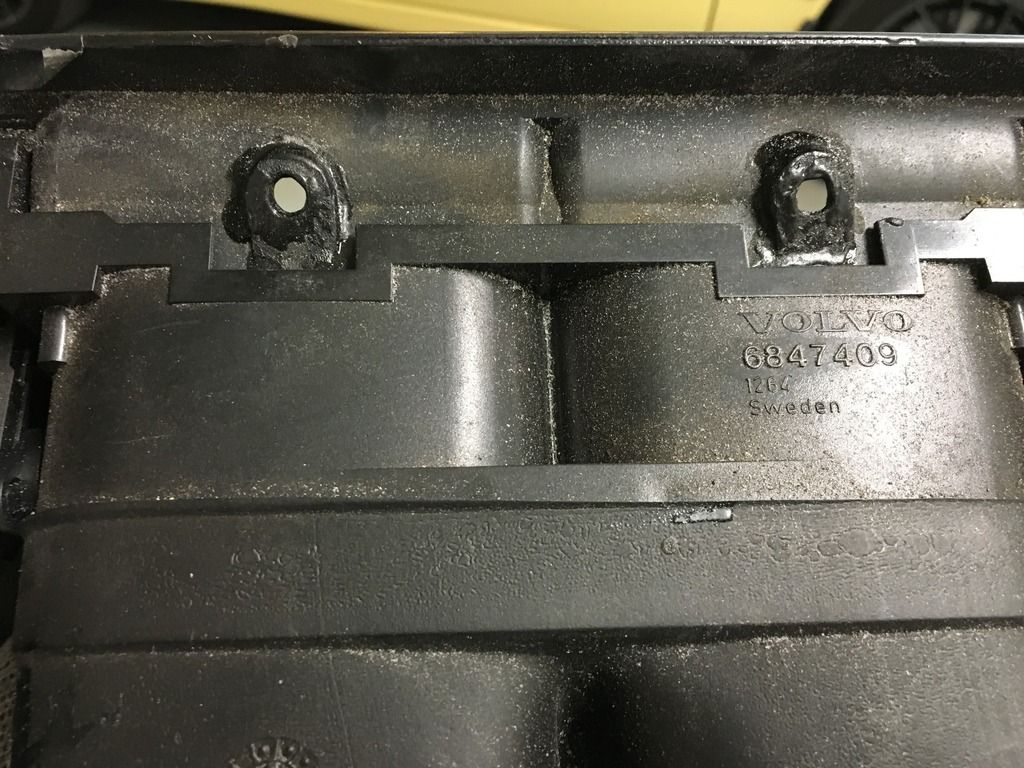
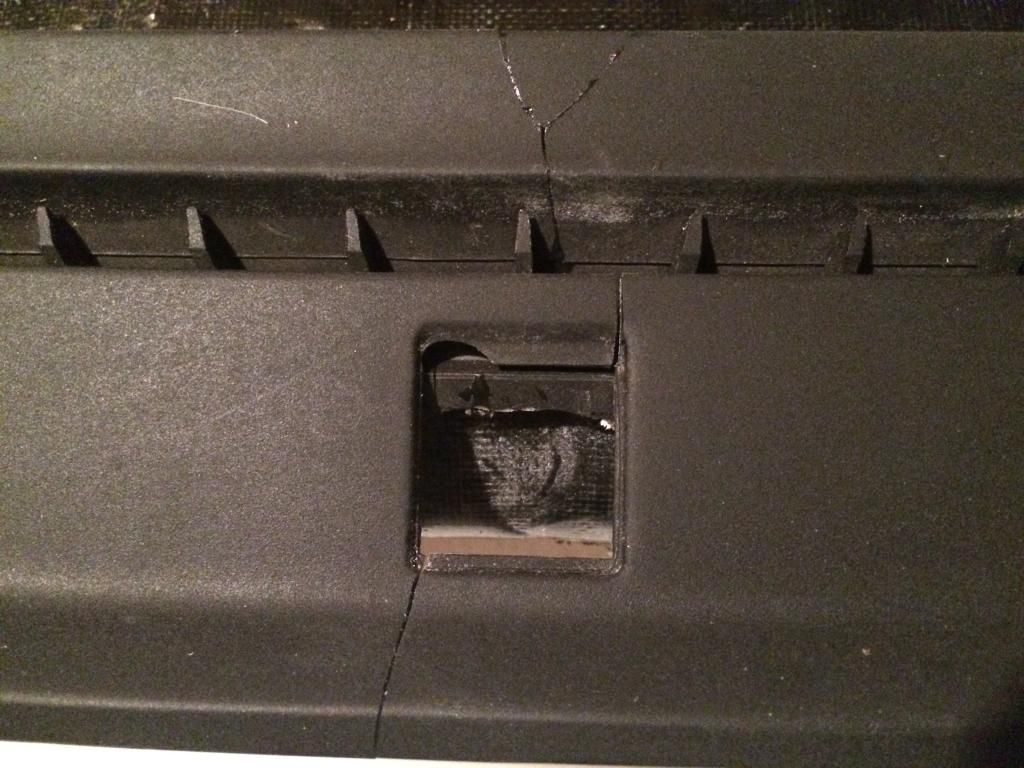
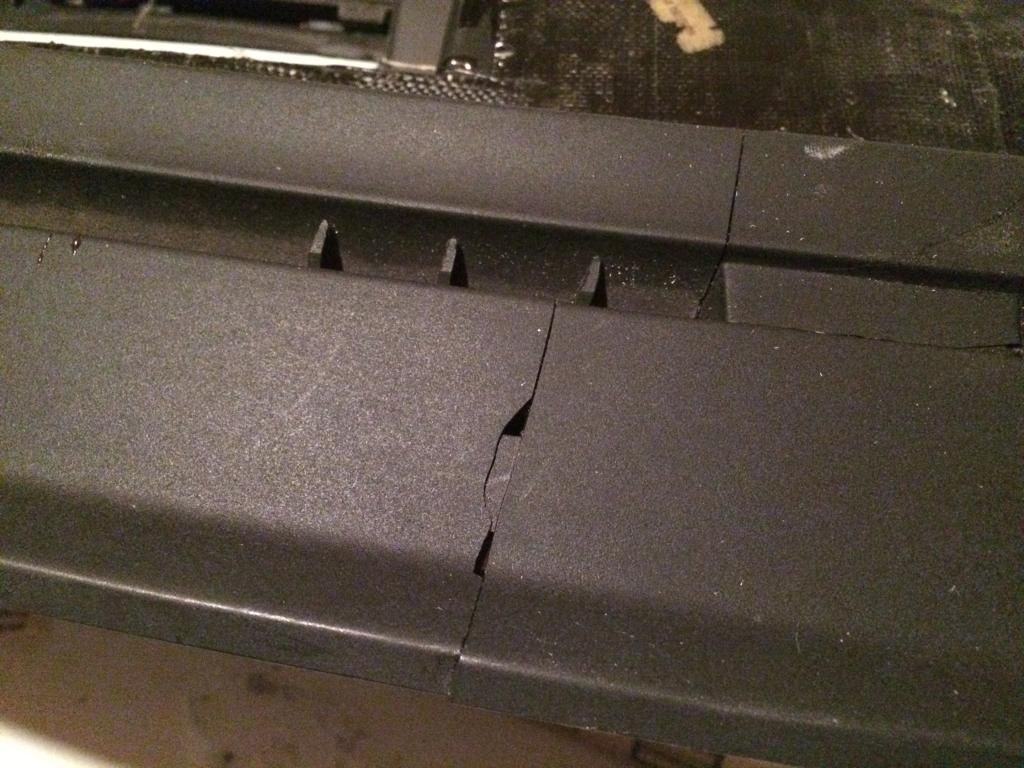
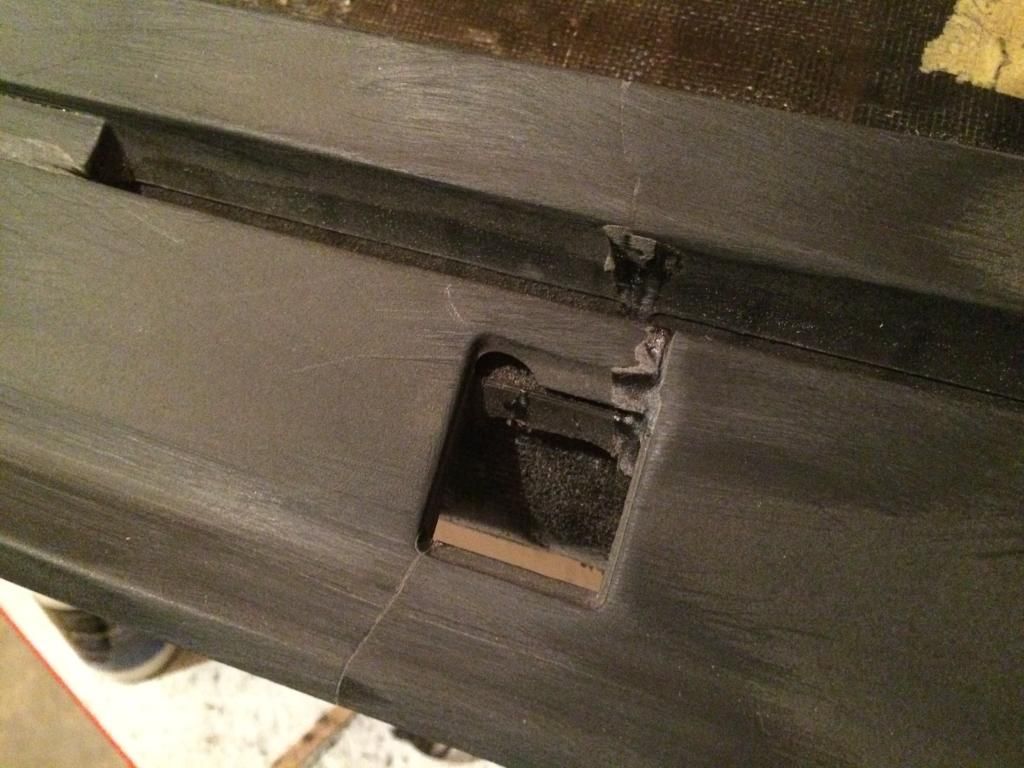
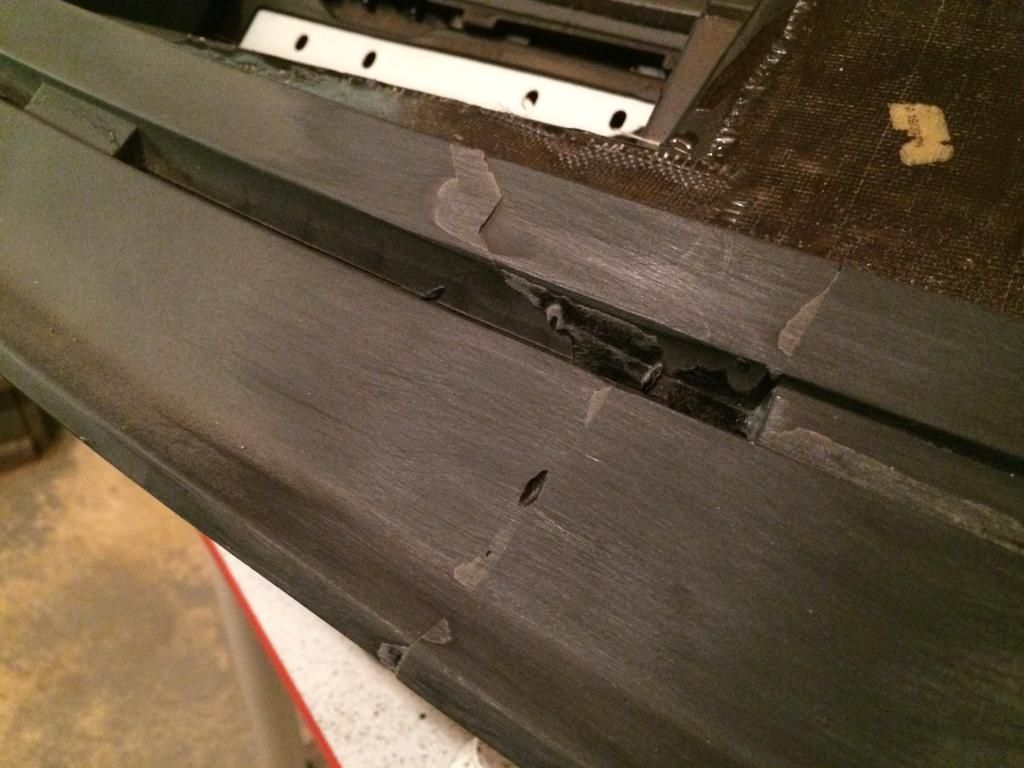
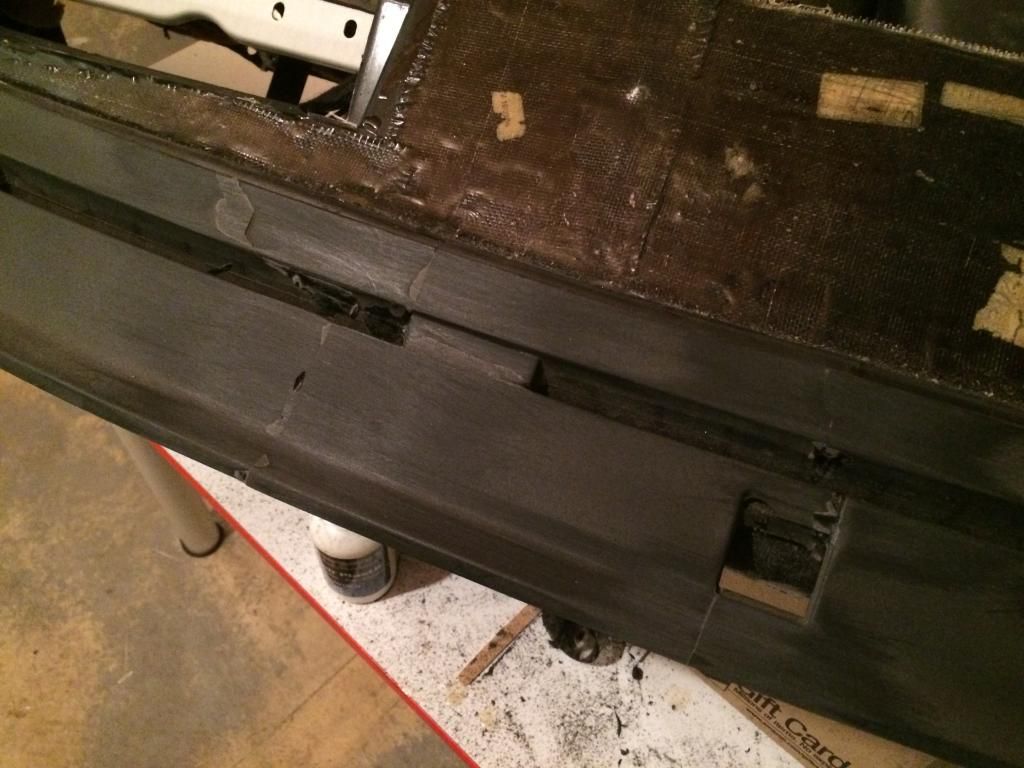
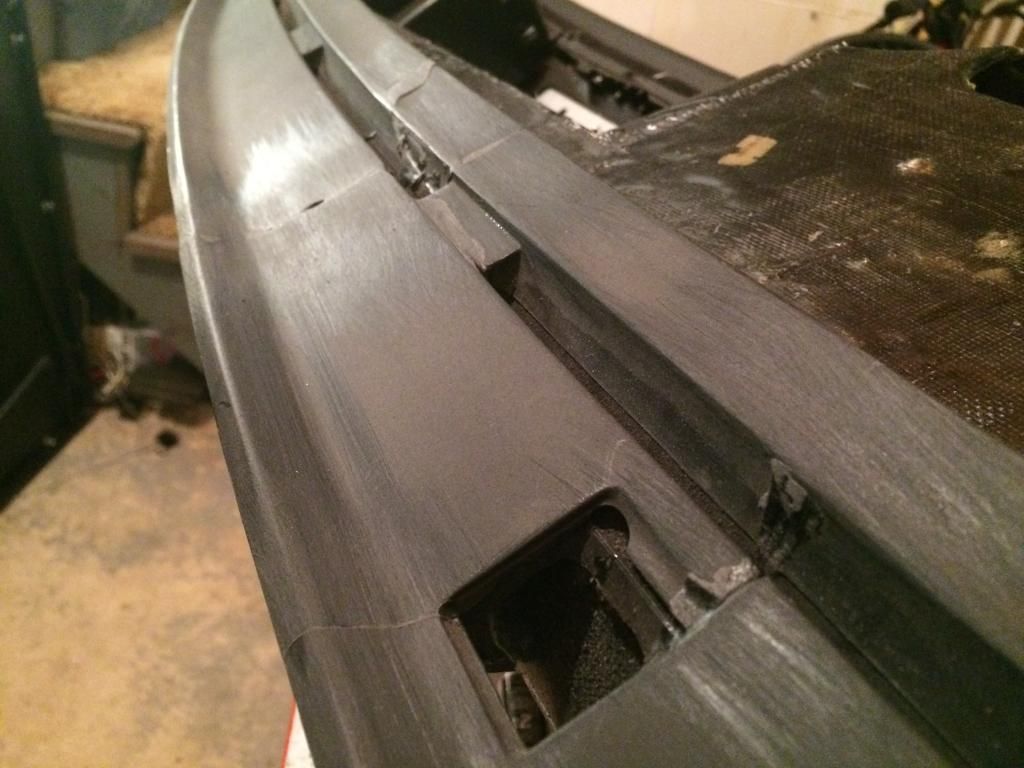
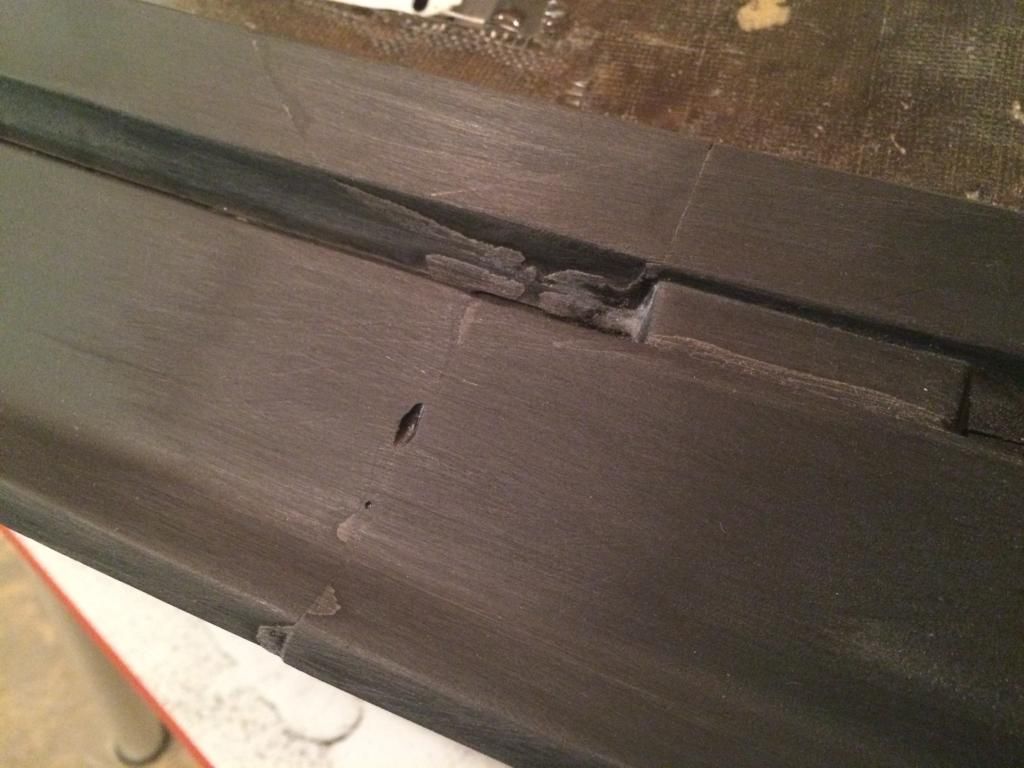
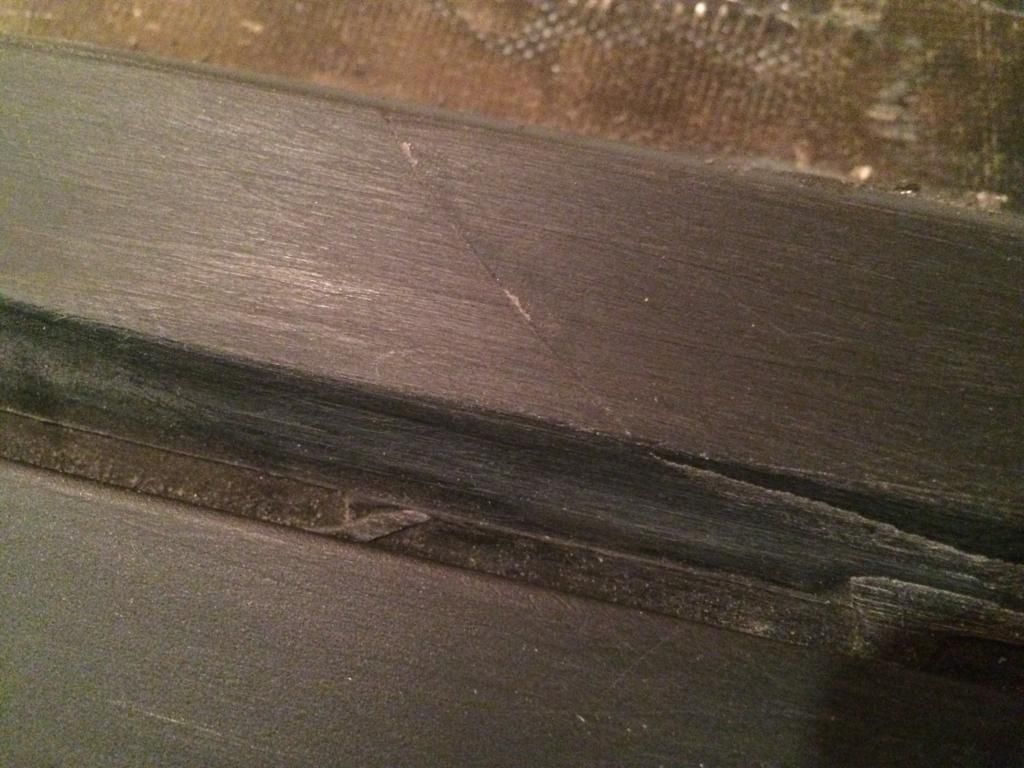
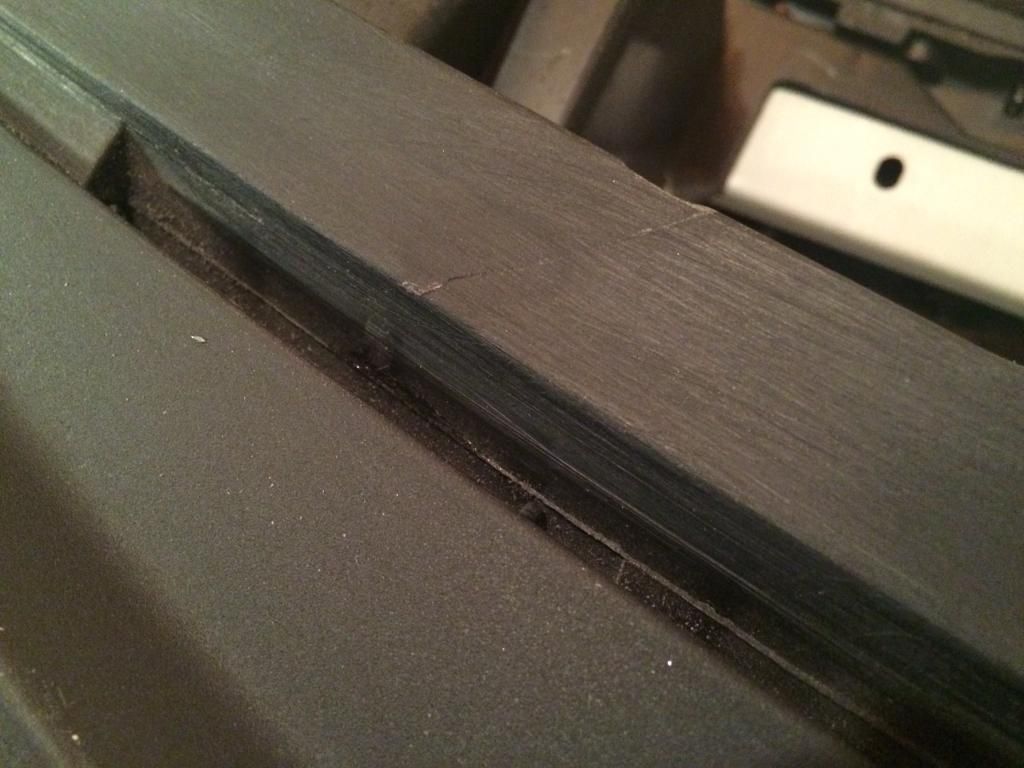
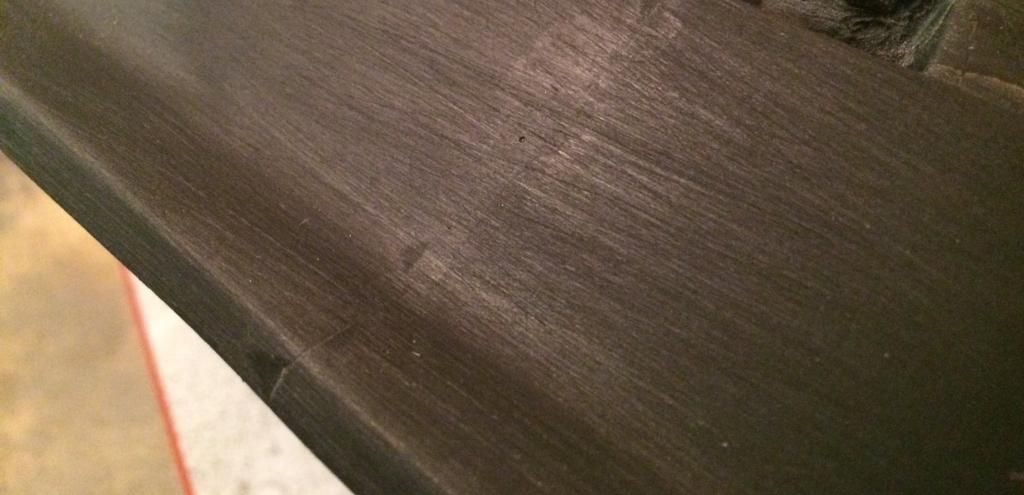
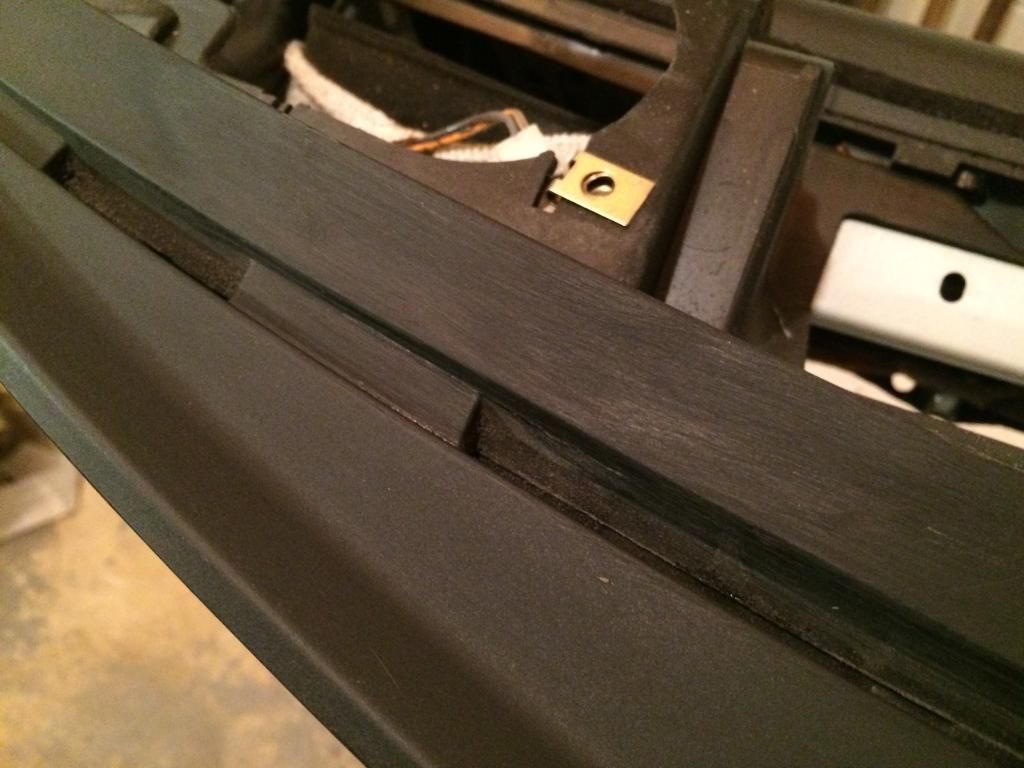
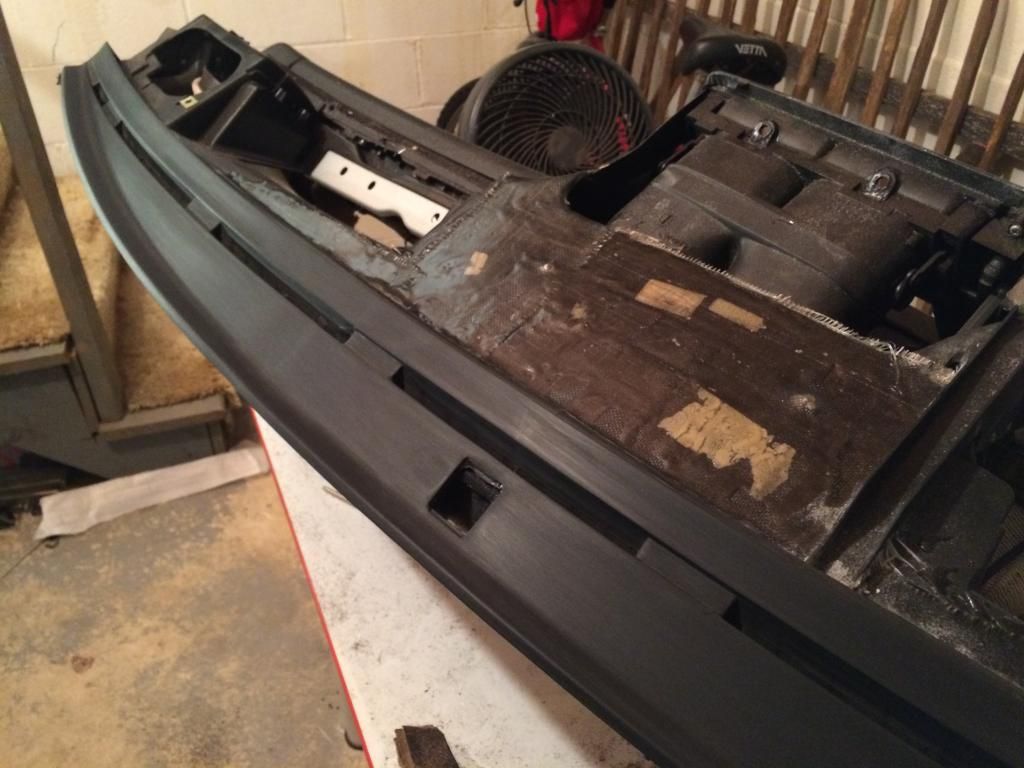
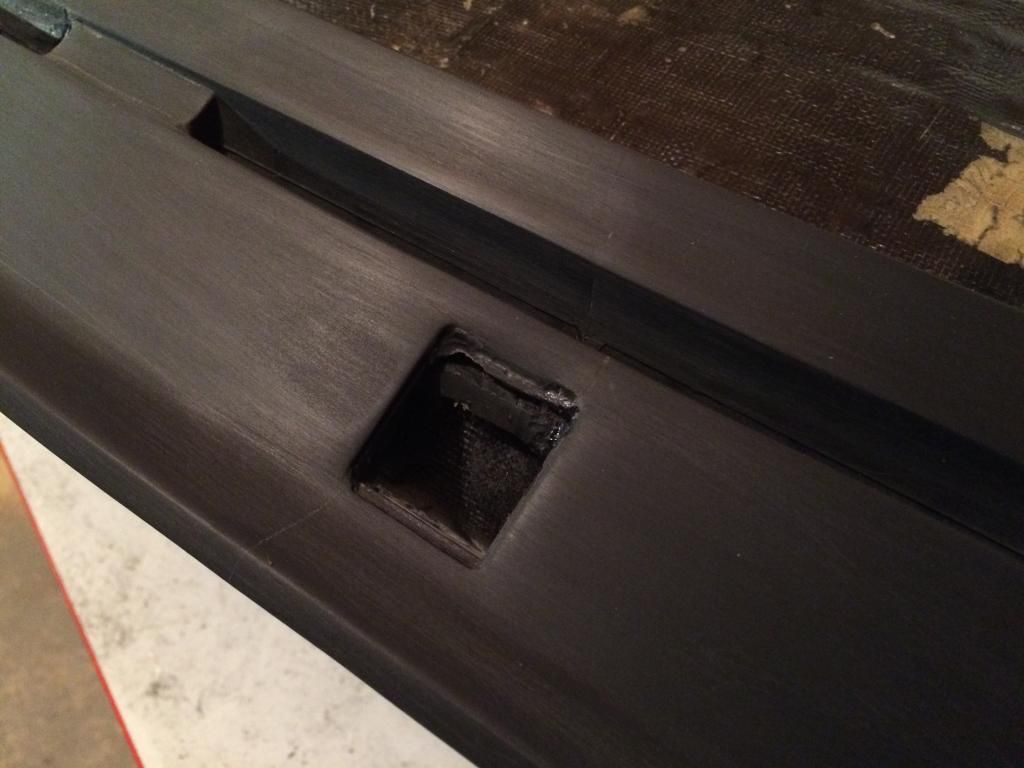
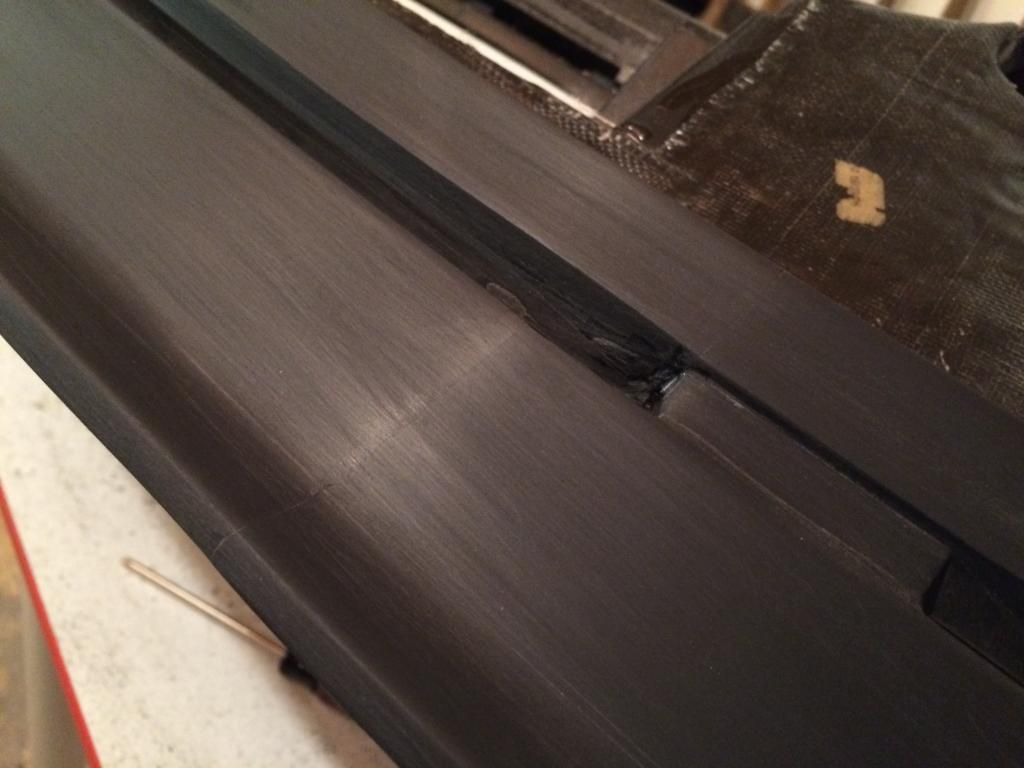
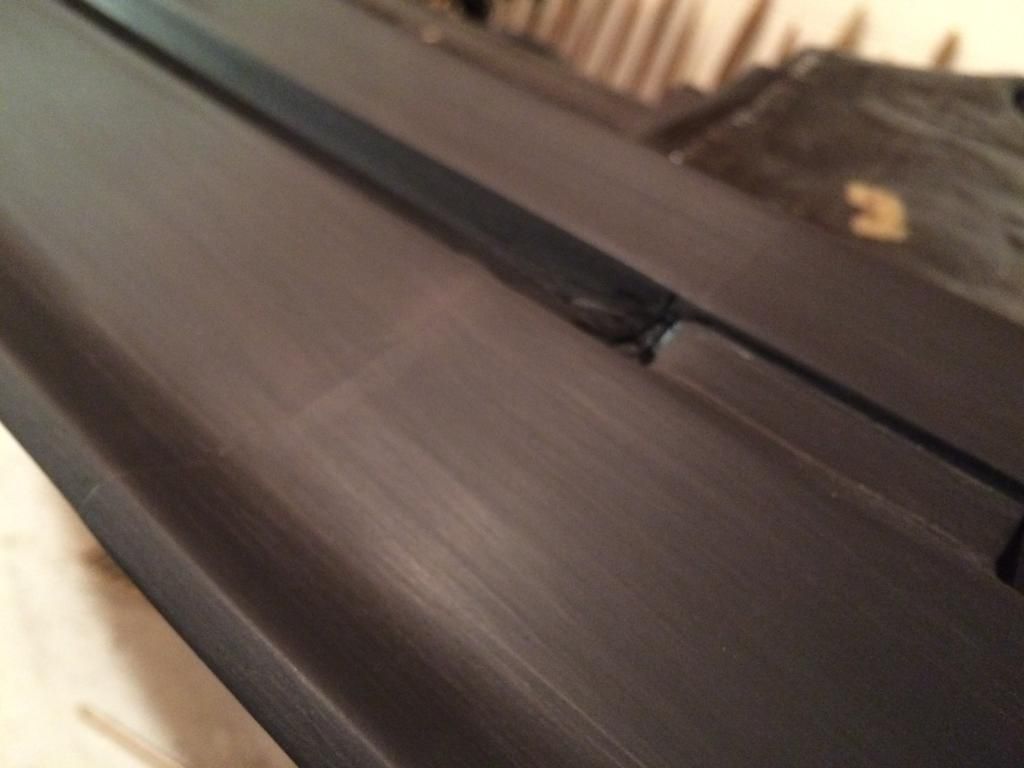
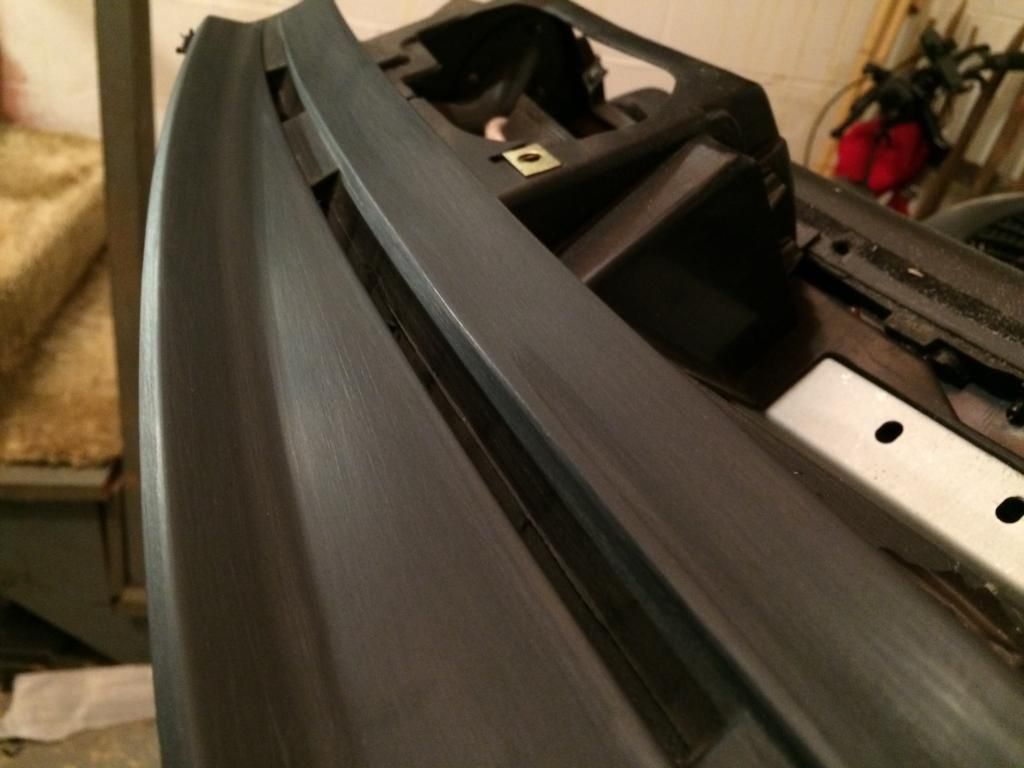
850 dashboards suffer a huge design flaw – the mounting points. They are made out of plastic and due to age and wear and tear, they WILL deteriorate and break over time. Unless your 850 has been driven only on smooth roads for its lifetime, I guarantee you have at least some mounts that are broken. Unfortunately, when the mounts break, it puts more stress on the structure of the dash because the weight of the dash is no longer evenly distributed. The increased stress, coupled with driving on bumpy/poorly maintained roads, inevitably leads to cracking in various parts of the dash structure. Many with broken dash mounts will also have cracks in the long, black plastic piece at the top of the dash adjacent to the windshield. The long black plastic piece is attached to the structural parts of the dash, so when the structure cracks, so does that piece.
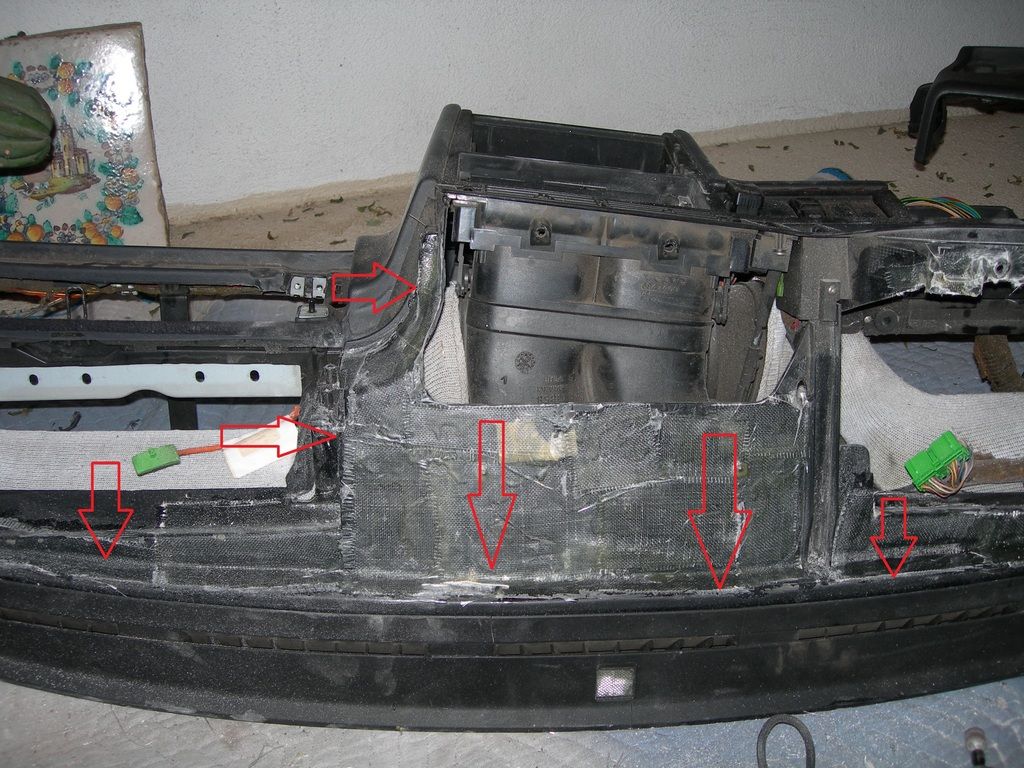
Here’s a picture showing the stress cracks along the structure of the dash. You can bet there is cracking on the backside of the structure of the dash as well. More on that below.
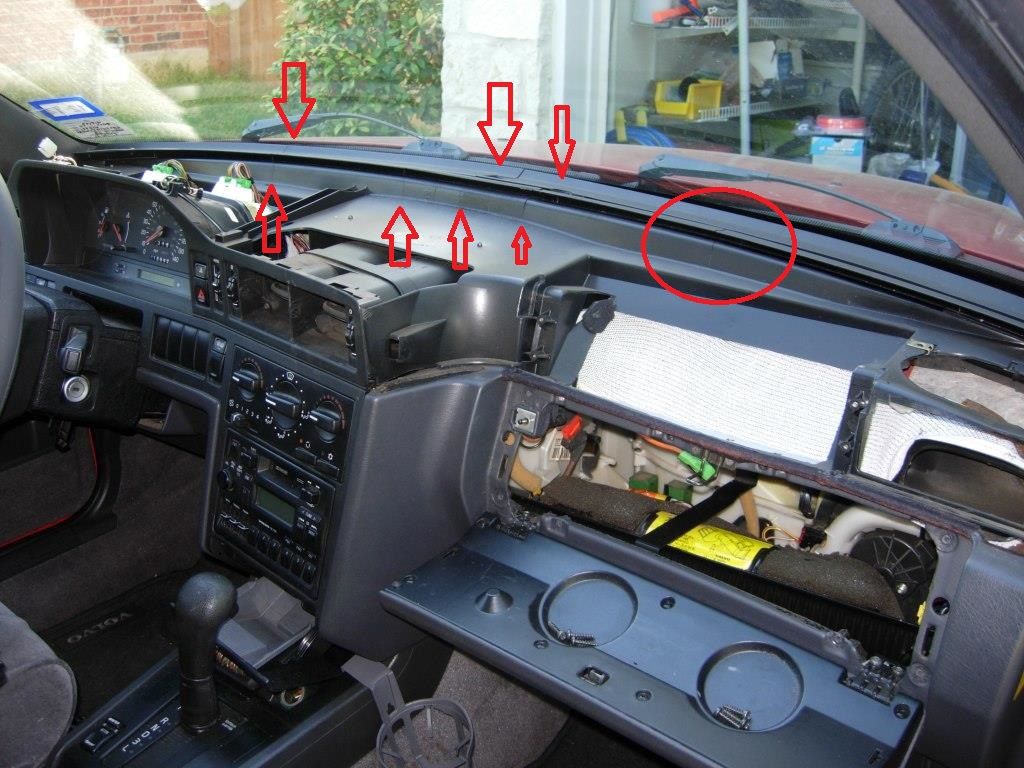
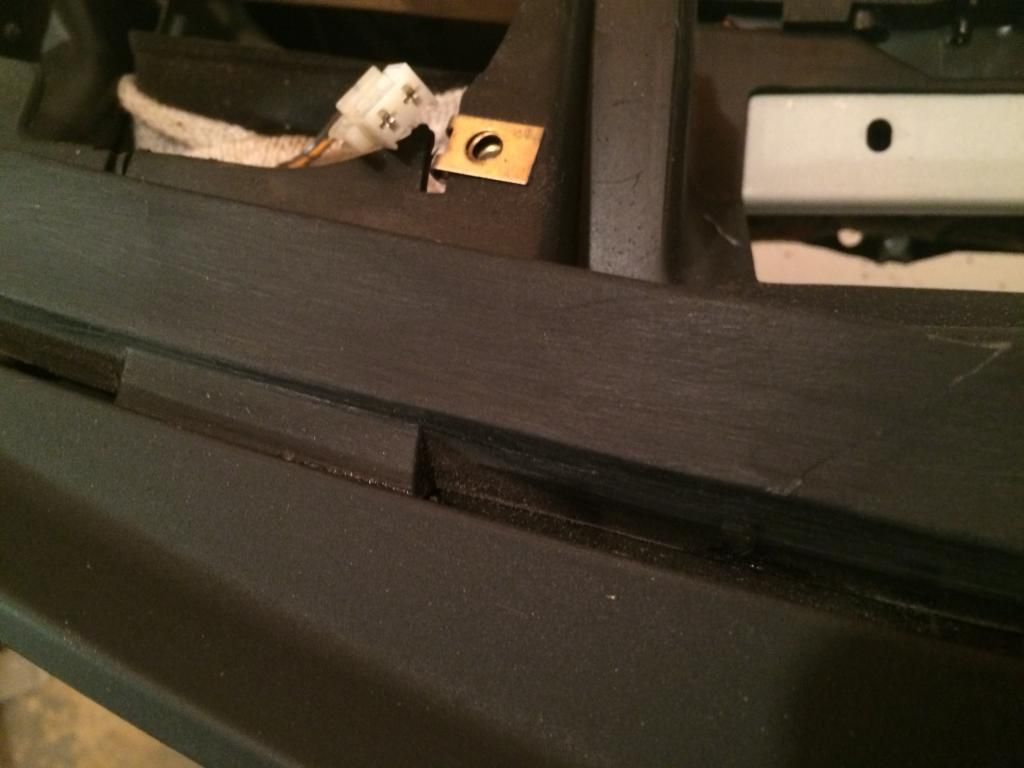
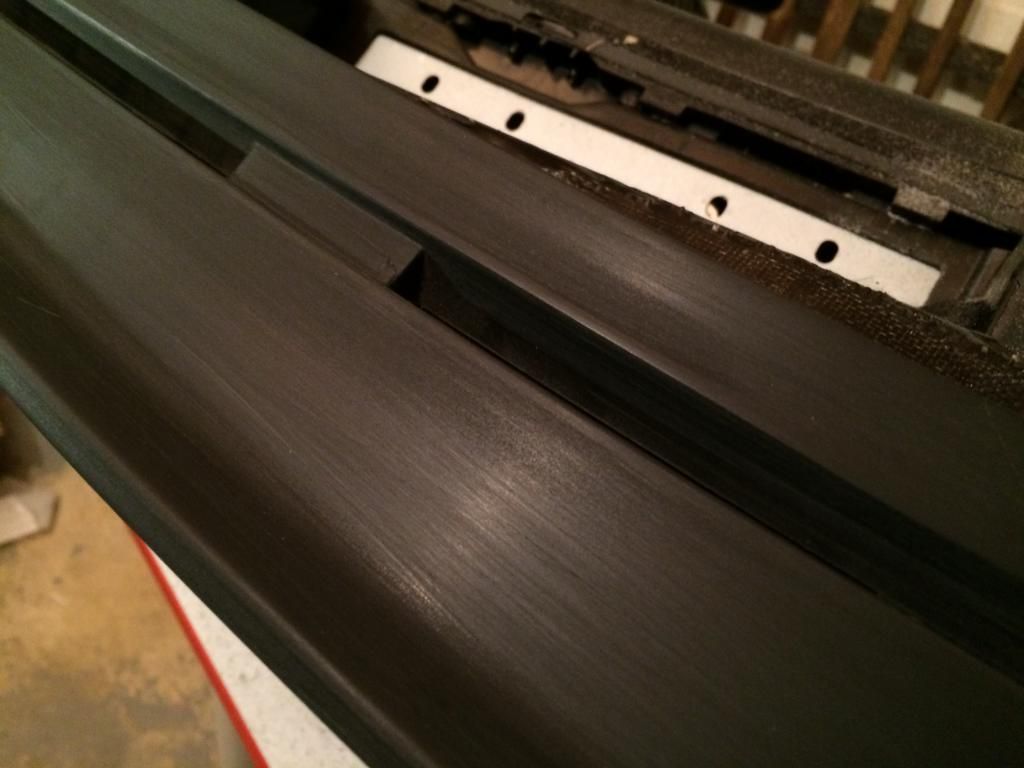
If you are repairing a used dashboard, you will very likely need to repair/reinforce more than just the mounts. You’ll need to address the structure as well. On a new dashboard, the structure is obviously intact, so you could probably get away with just reinforcing the mounts. But new dashboards are virtually impossible to find – we’re talking about 20+ year old parts here.
Repair methods that do not work:
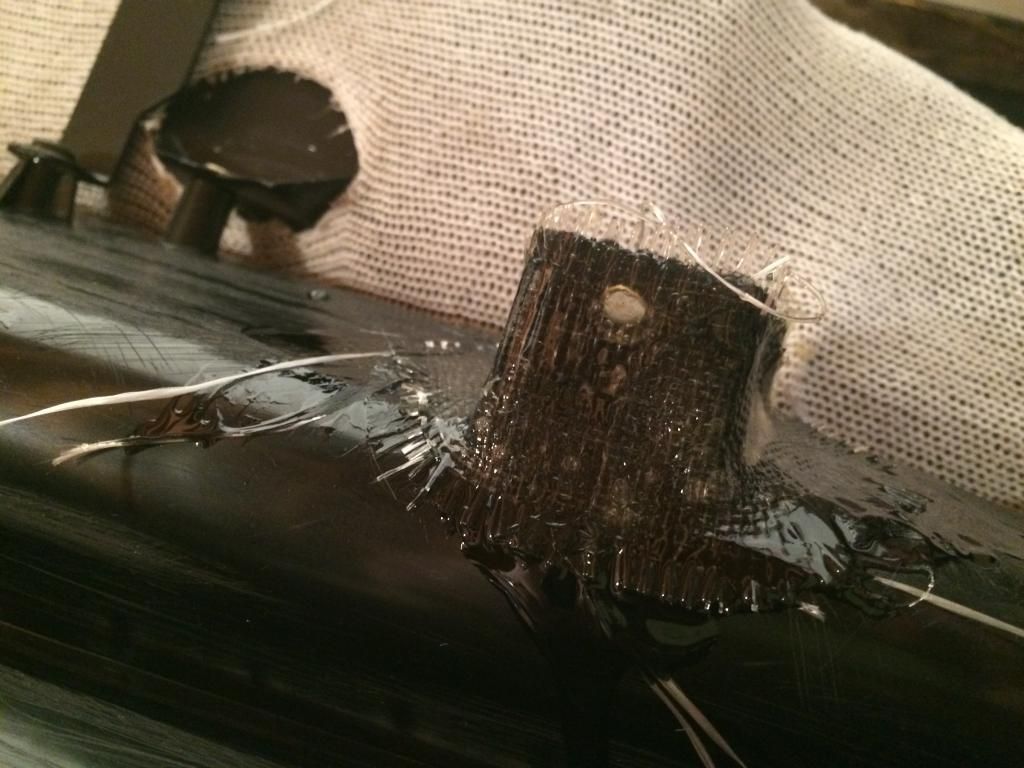
-Metal strap method on dash mounts: there are many write-ups that show people reinforcing the mounts by attaching metal straps or other metal-based supports. The metal is attached to the structure of the dash with rivets, screws, etc. DO NOT DO THIS. This is the absolute worst thing you can do and it WILL ruin your dash over time. I have personally tried this repair method, and it resulted in a destroyed dashboard. The dash is quieter and more secure at first, but over time, it will break. The problem with this method is that when you drill/screw into the dash to attach the metal supports, you’re actually weakening the plastic structure of the dash. Over time, cracks WILL develop at the drilling/securing points, which will result in further cracking throughout the structure, and ultimately a ruined dash. In short, do not screw or drill into the plastic of dash. Example pics:
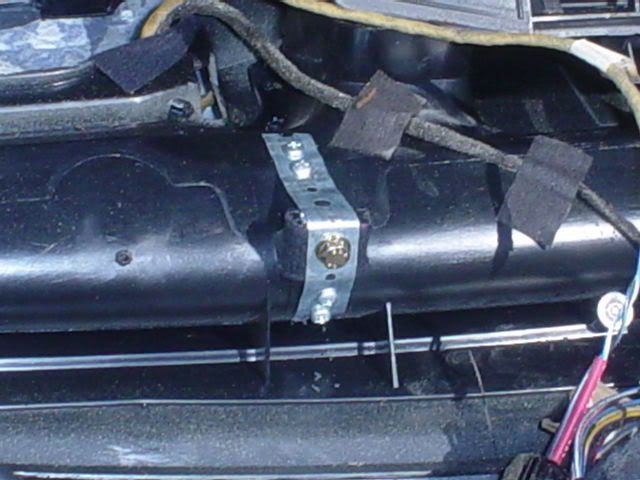
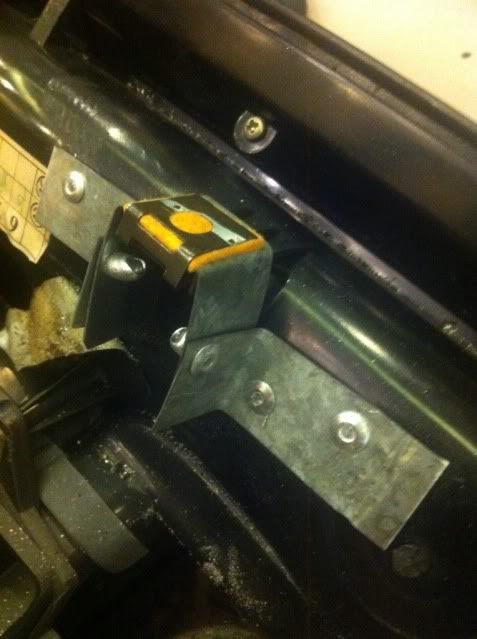
AGAIN, DO NOT DO THIS^^^^^^^^^^^^^^^^^^^
-Gluing/epoxying the dash mounts: this method will only work well if you have zero cracks in the structure of the dash. As mentioned, 99% of you are going to have at least some minor cracking around the dash structure. Reinforcing the mounts is only a band aid fix. The fact that the structure is impaired means it cannot properly support the weight of the dash, or the force of bumps in the road, and it will deteriorate over time. Your mounts will eventually crack off of the dashboard and you’ll be left with a dashboard that “floats” in the cabin, moving around and rattling like crazy.
-JB Weld: I used this on one of my dashboards to reinforce the mounts AND structure. I applied liberal amounts of JB weld on the dash mounts and structure, basically anywhere that looked like it could crack. It has held up for several years now, but I am not confident enough to say that it’s a permanent fix. I’ve seen JB weld crack in other applications, so it’s not the best solution.
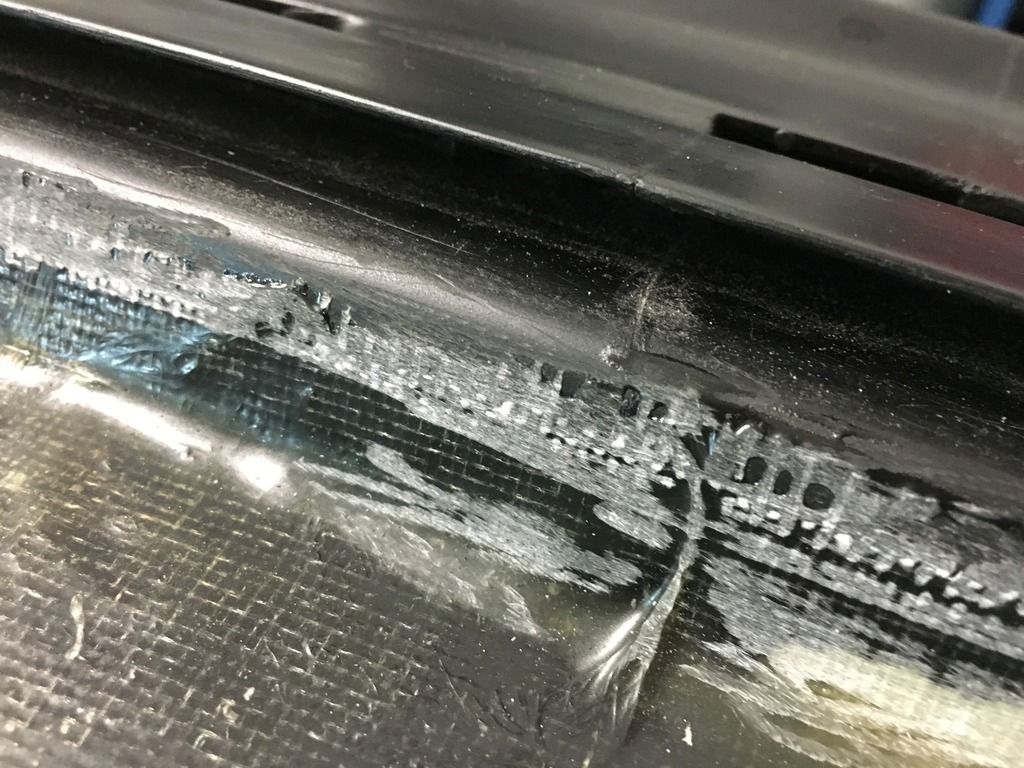
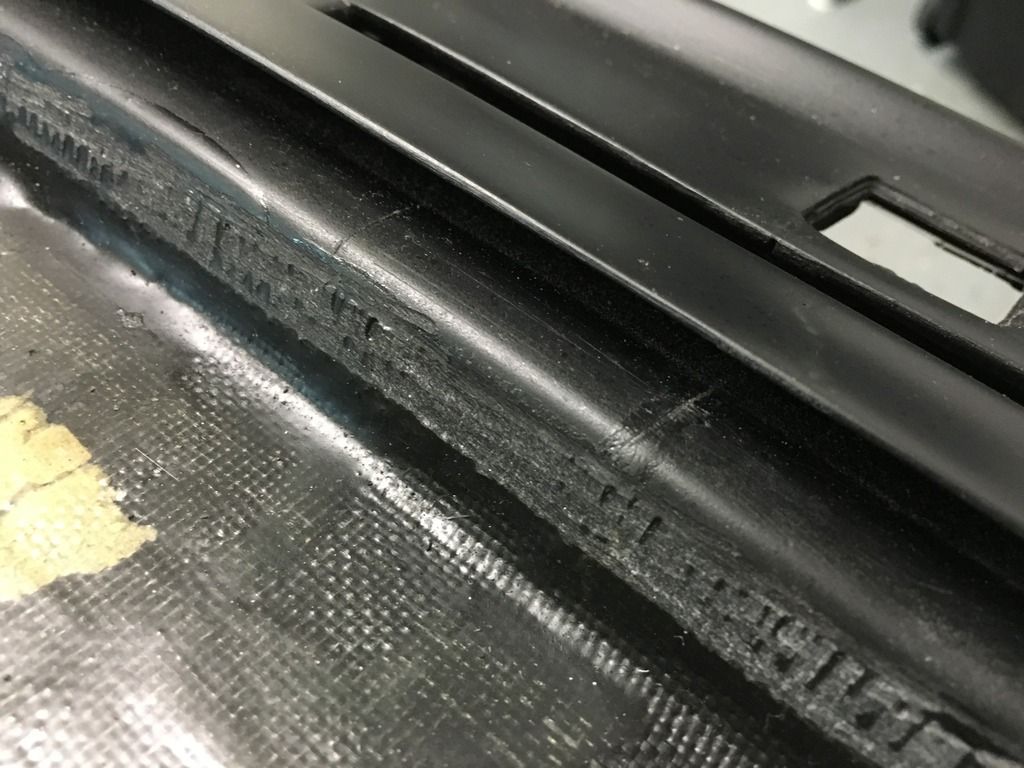
Permanent solution: fiberglass. Use fiberglass to reinforce the dash mounts and the structure of the dash. In essence, you’re building a dash within a dash (queue inception).
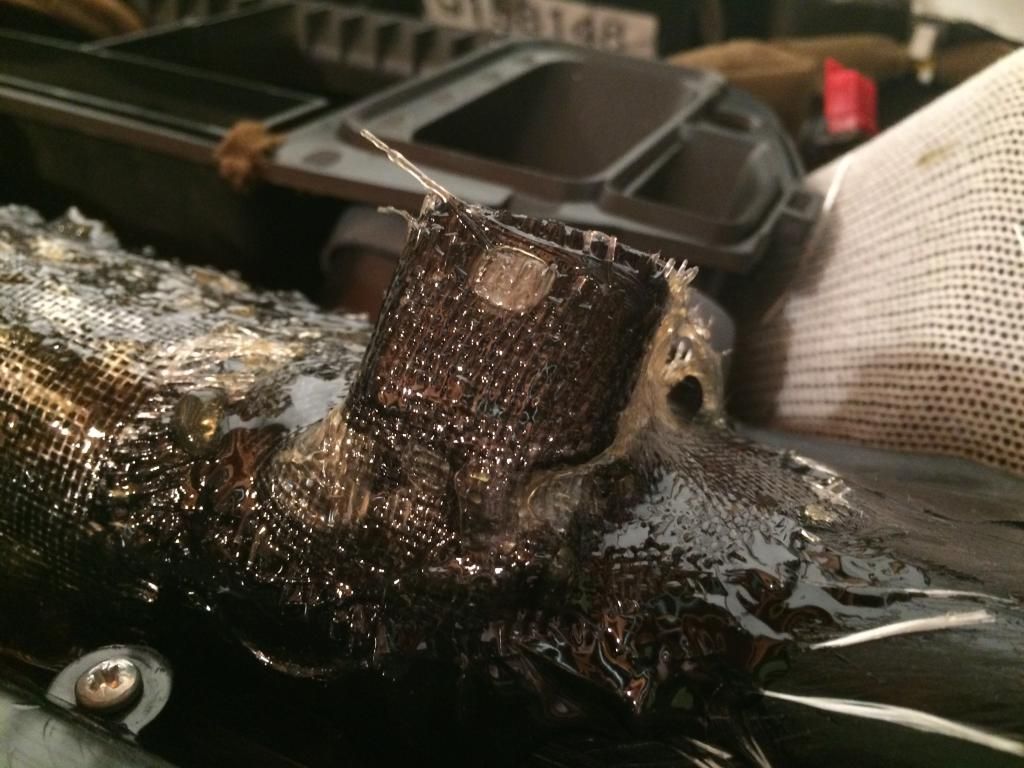
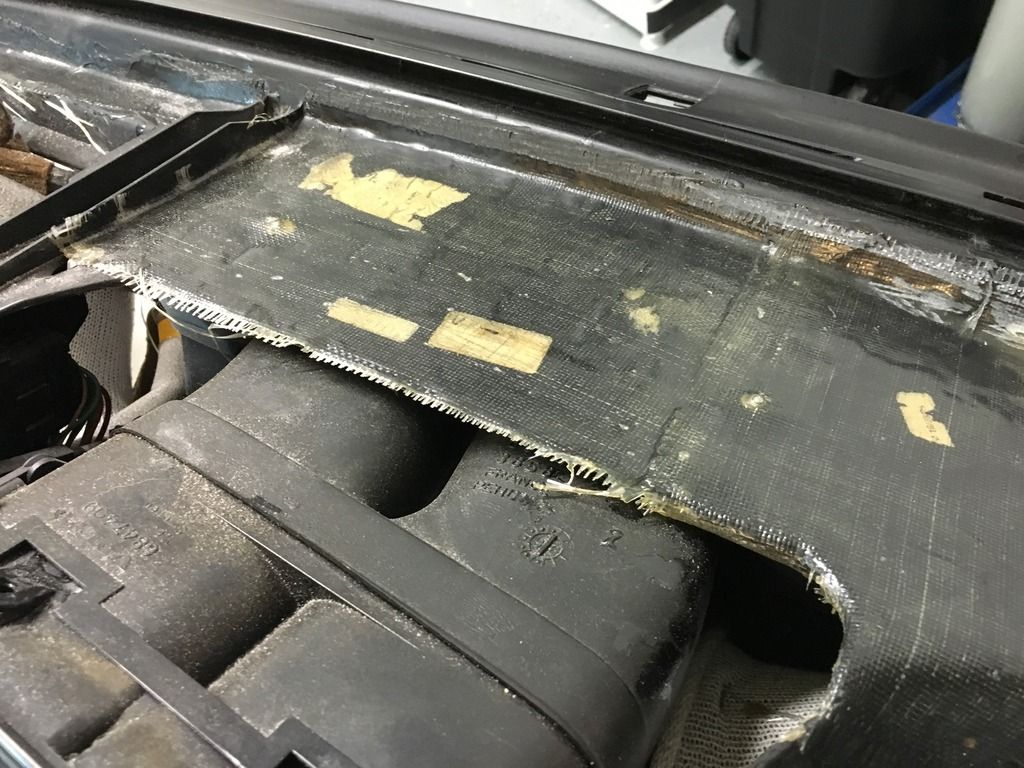
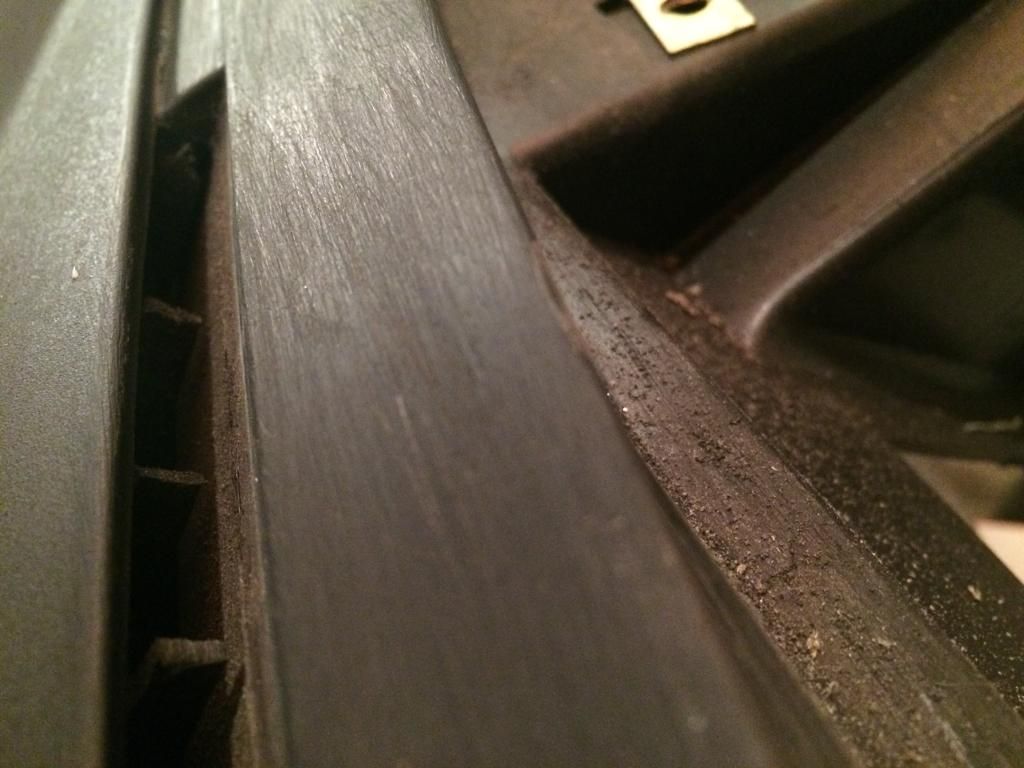
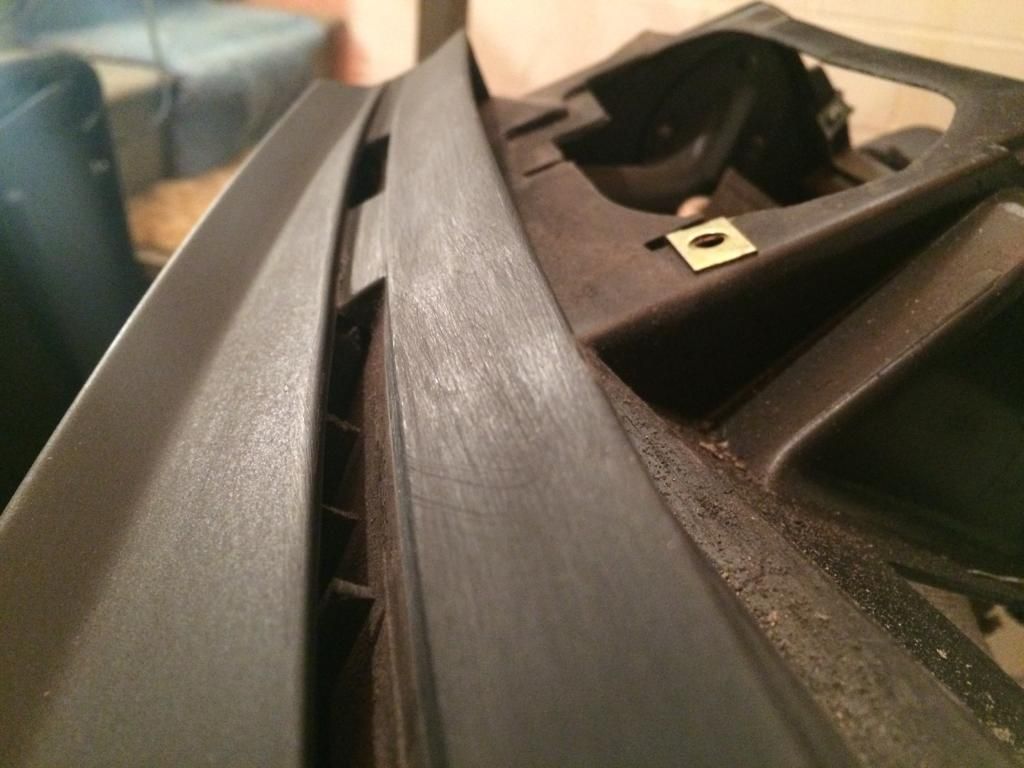
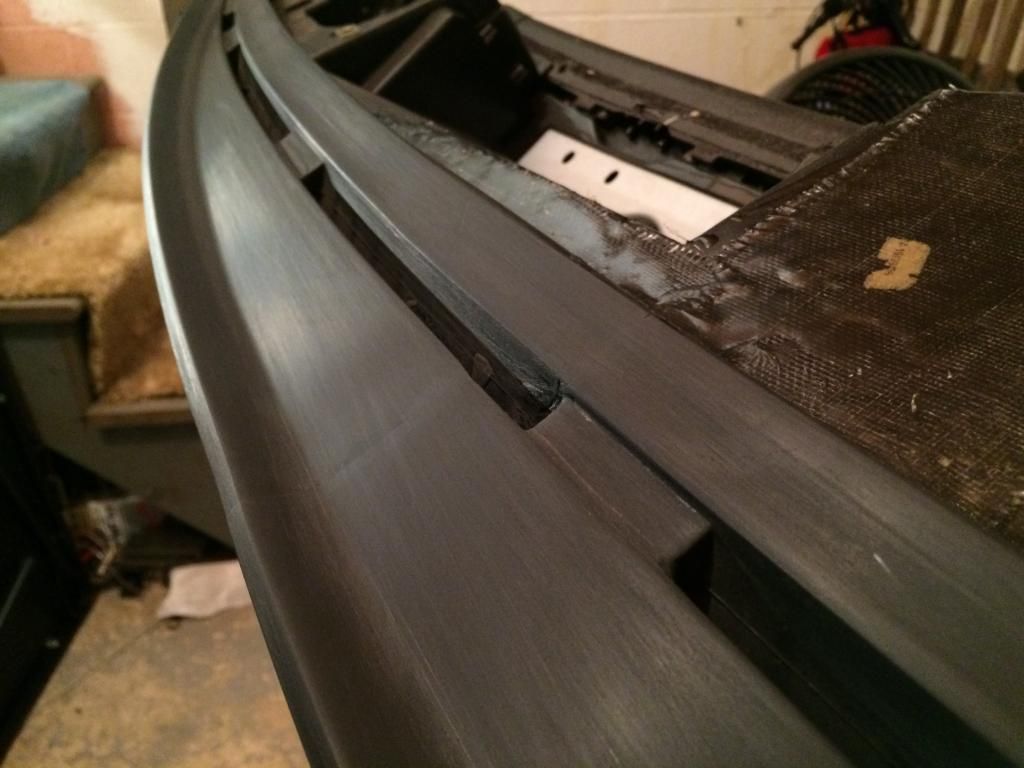
The first two pictures are not mine, but they provide a good bird’s eye view of the areas you want to reinforce. I’ve inserted red arrows showing some of the areas you want to reinforce on the top of the dash. On the underside of the dash with the mounting tabs, it’s self explanatory.
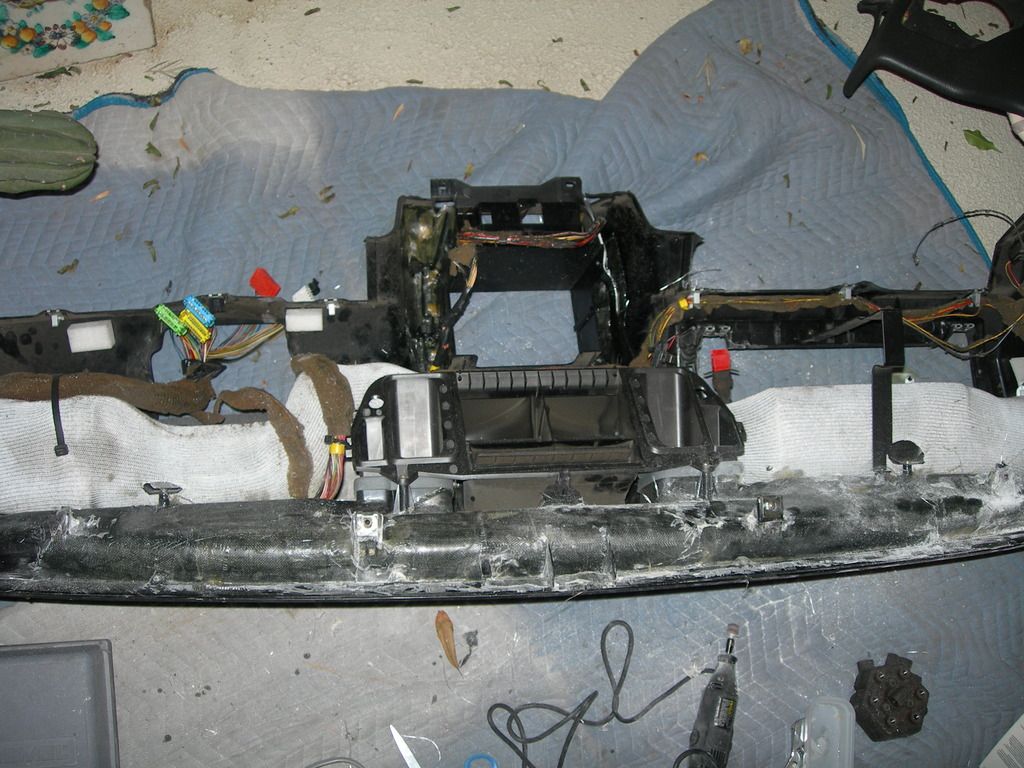
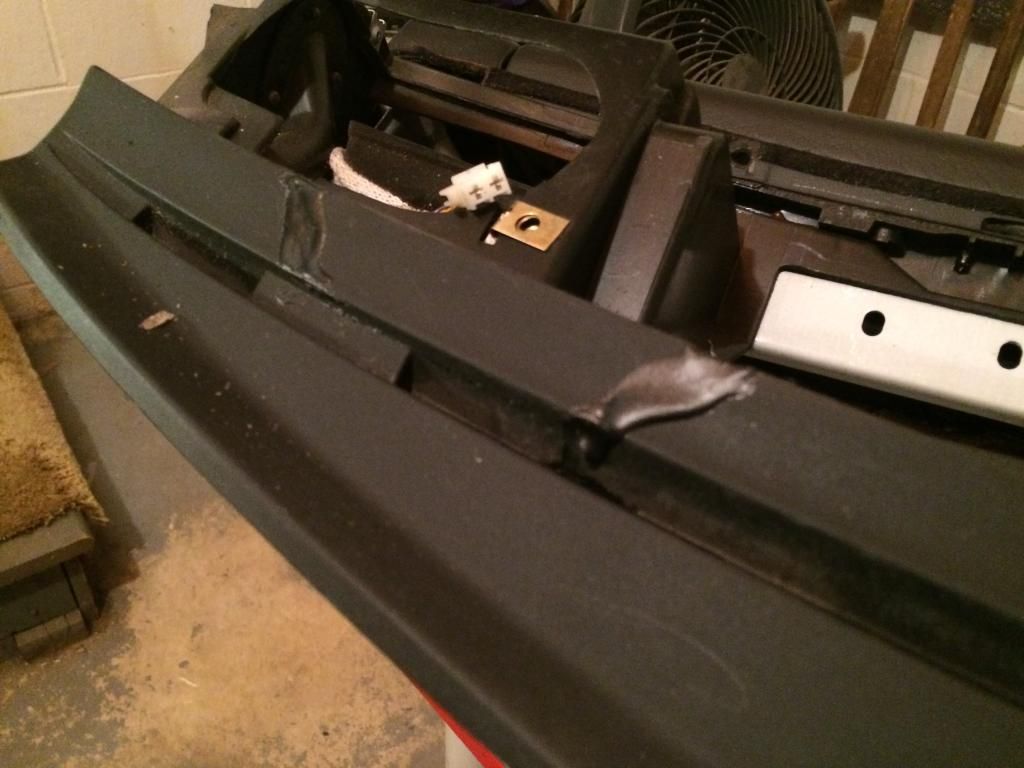
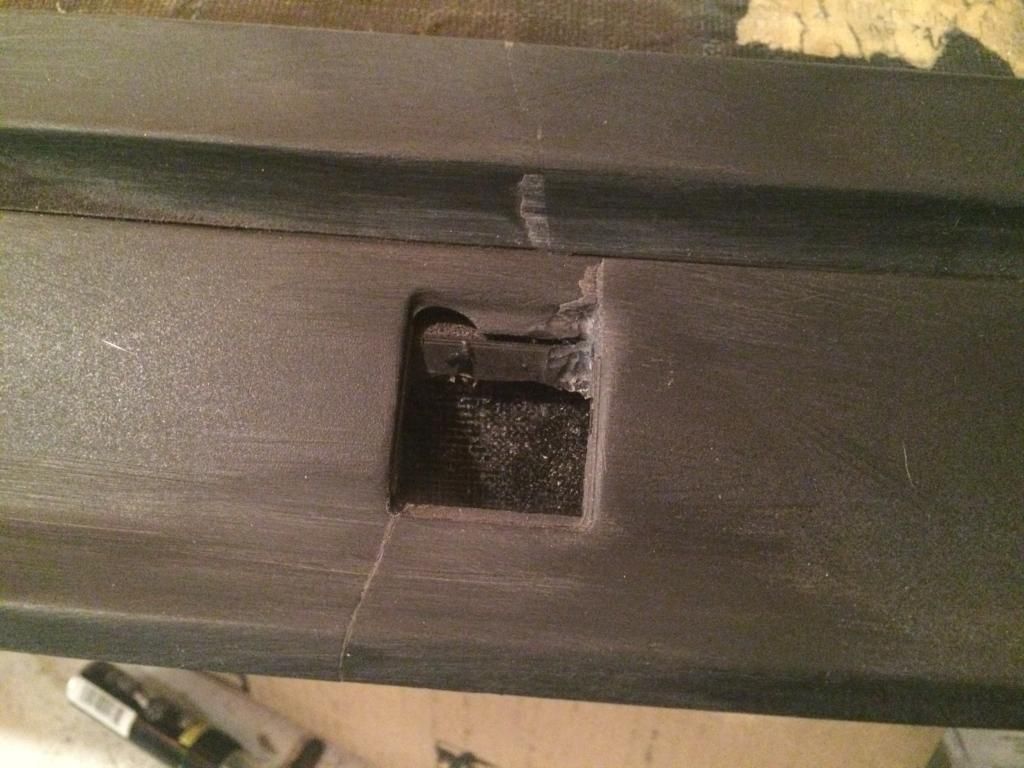
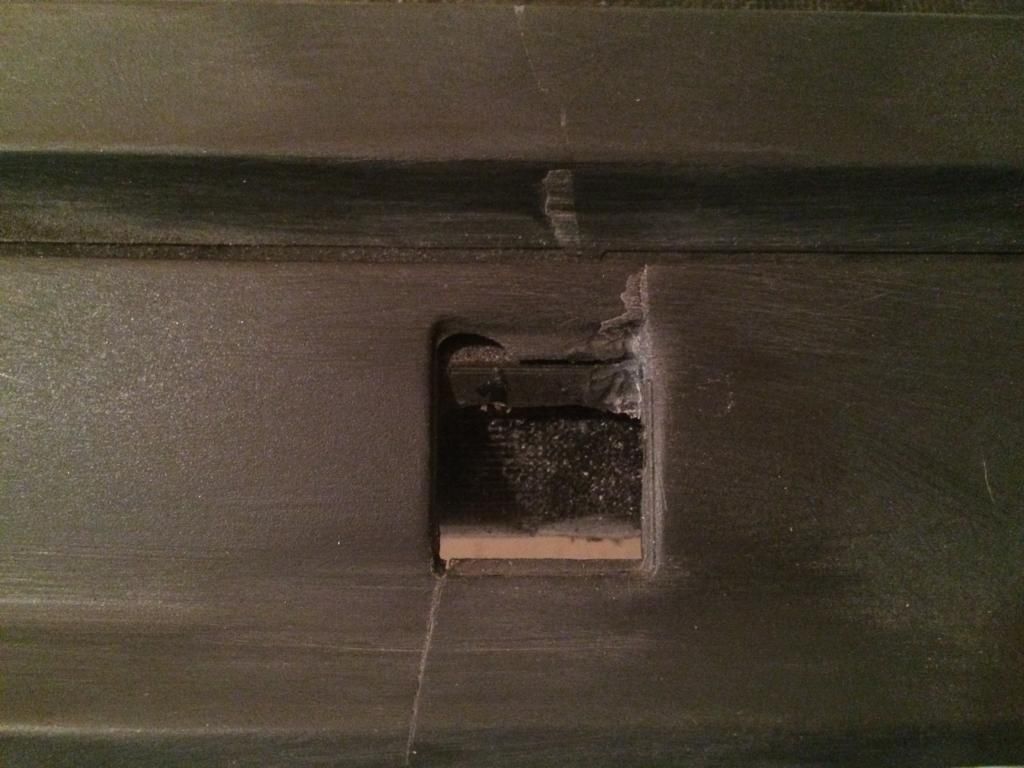
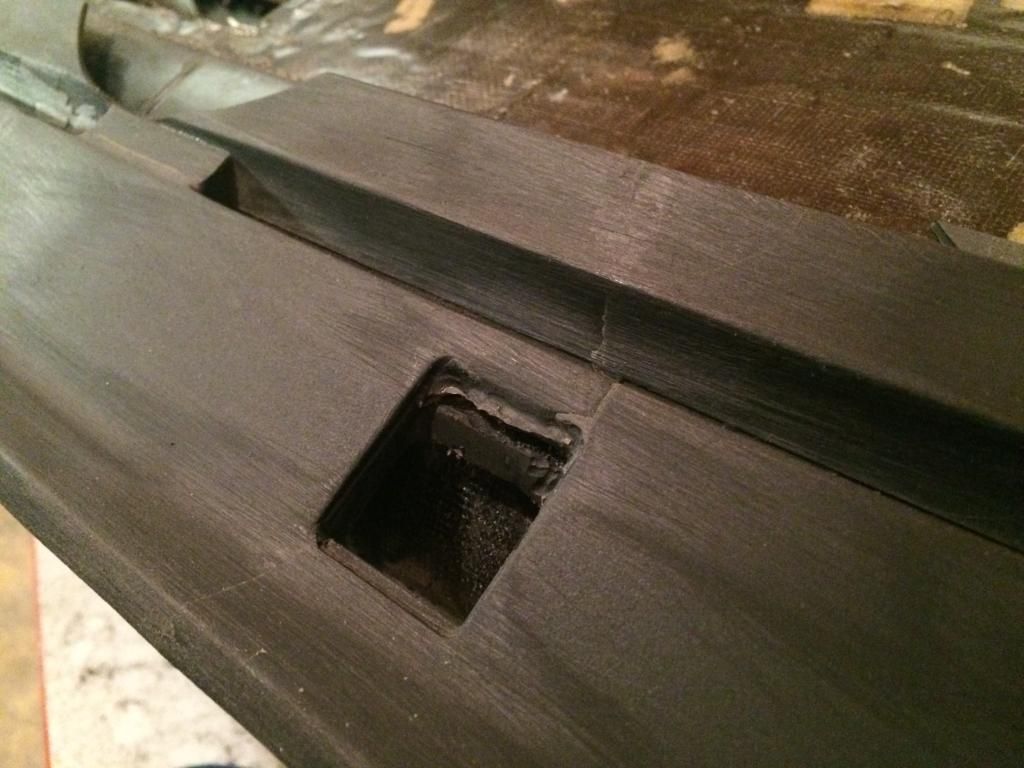
The remaining pics are from my repair. The first group of pictures shows the condition of the dash when I got it. The tabs were broken off, there were holes in the back of the dash, etc. Obviously, before fiberglassing anything, you’ll need to attach the mounting tabs to the dash. I used super glue. My go-to superglue is Loctite super glue “professional.” It’s the absolute strongest and quickest drying glue I’ve worked with. It’s awesome stuff, but it’s extremely strong, and very easy to accidentally glue your fingers, clothing, etc, so be careful.

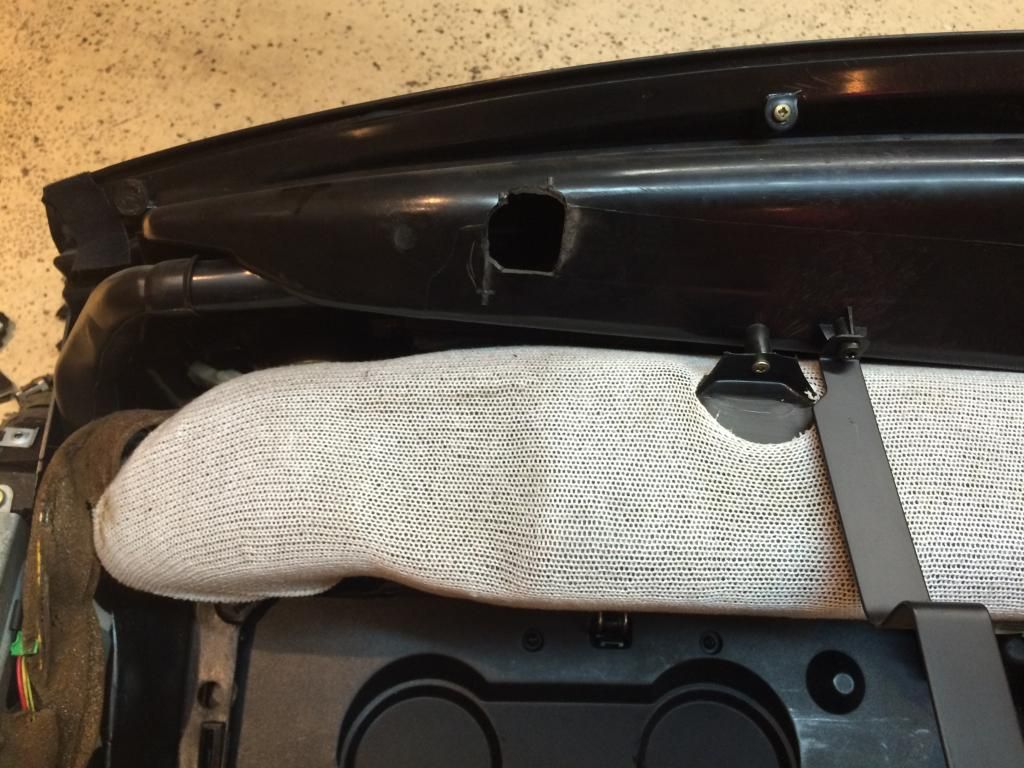
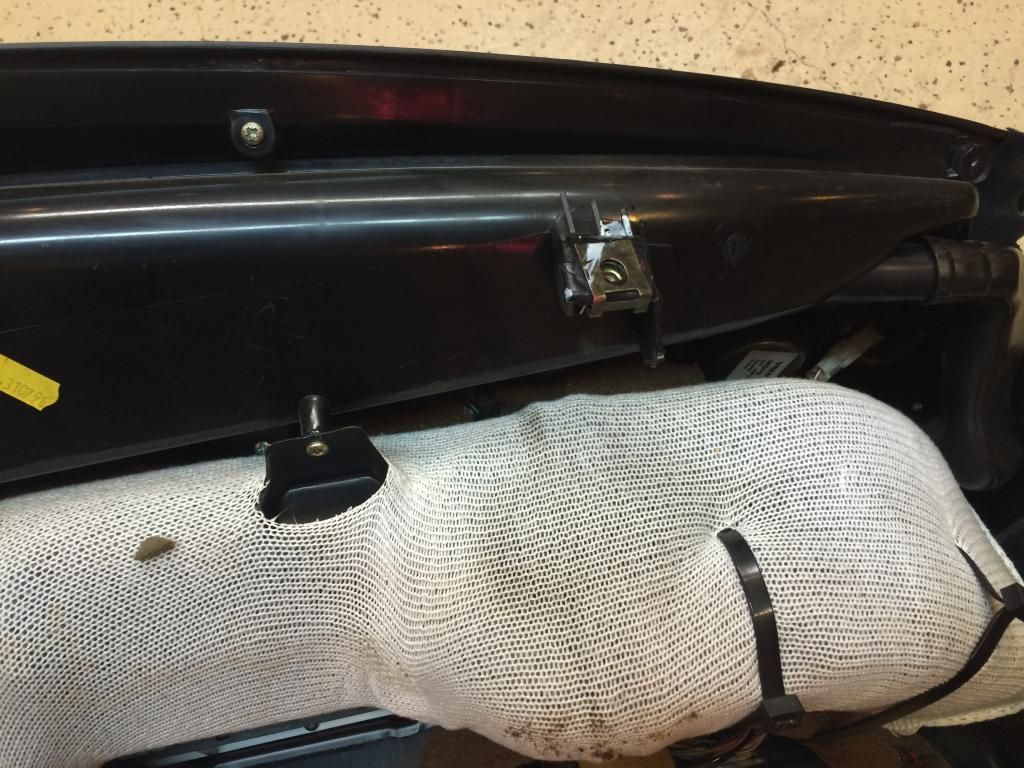
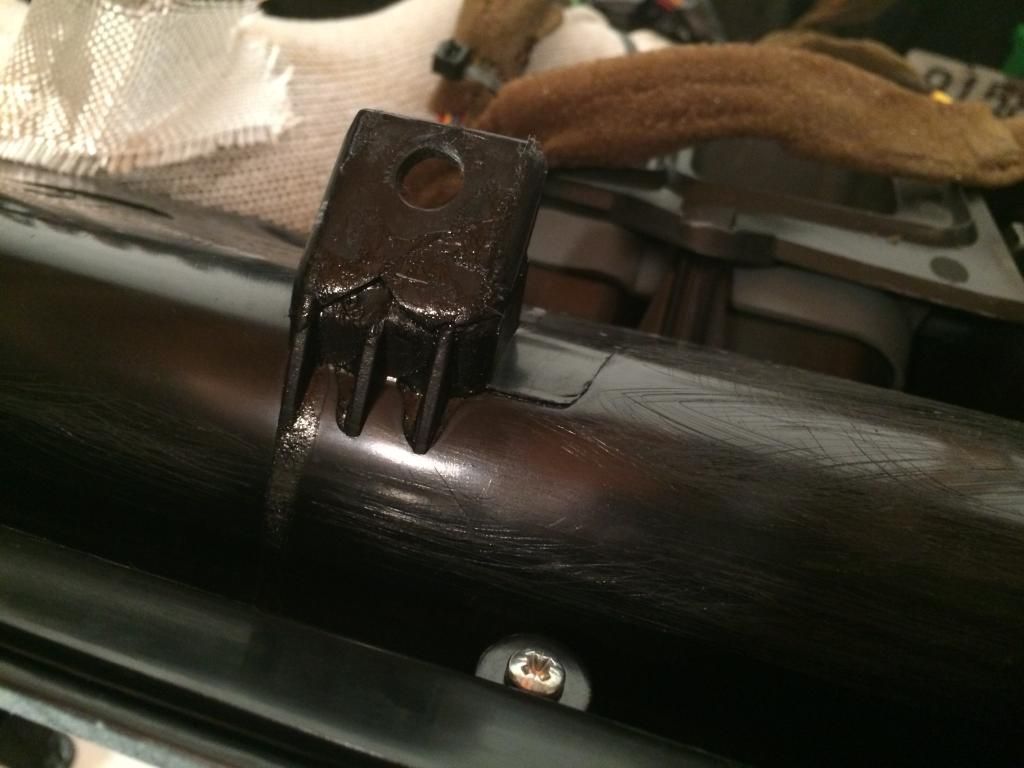
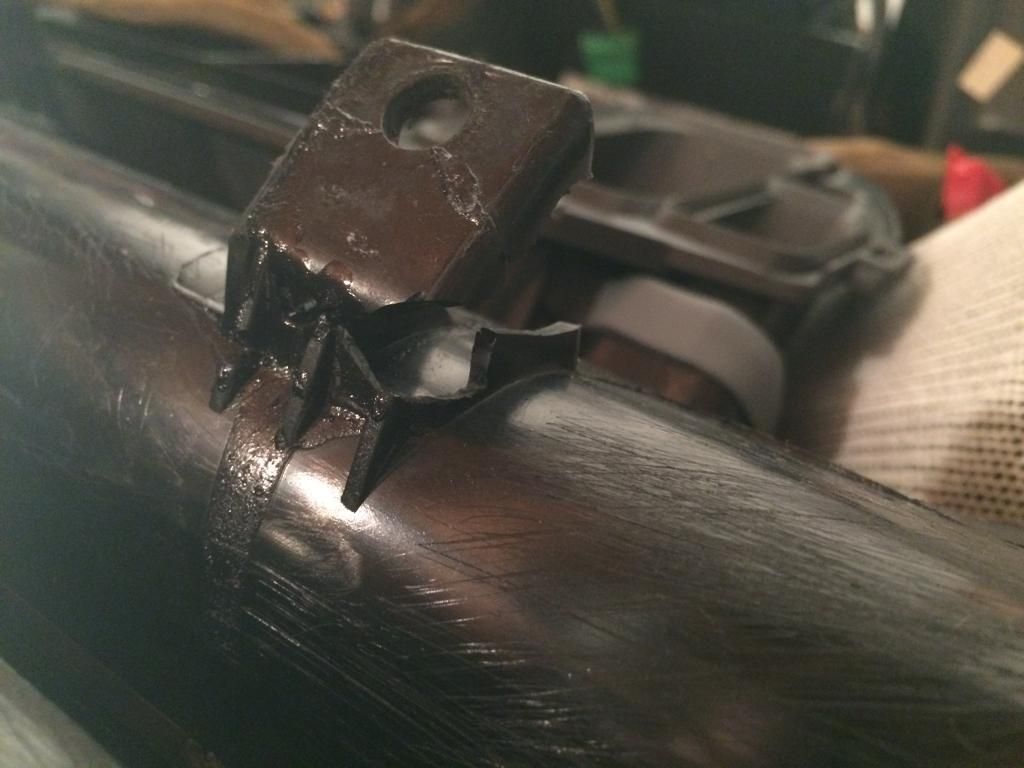
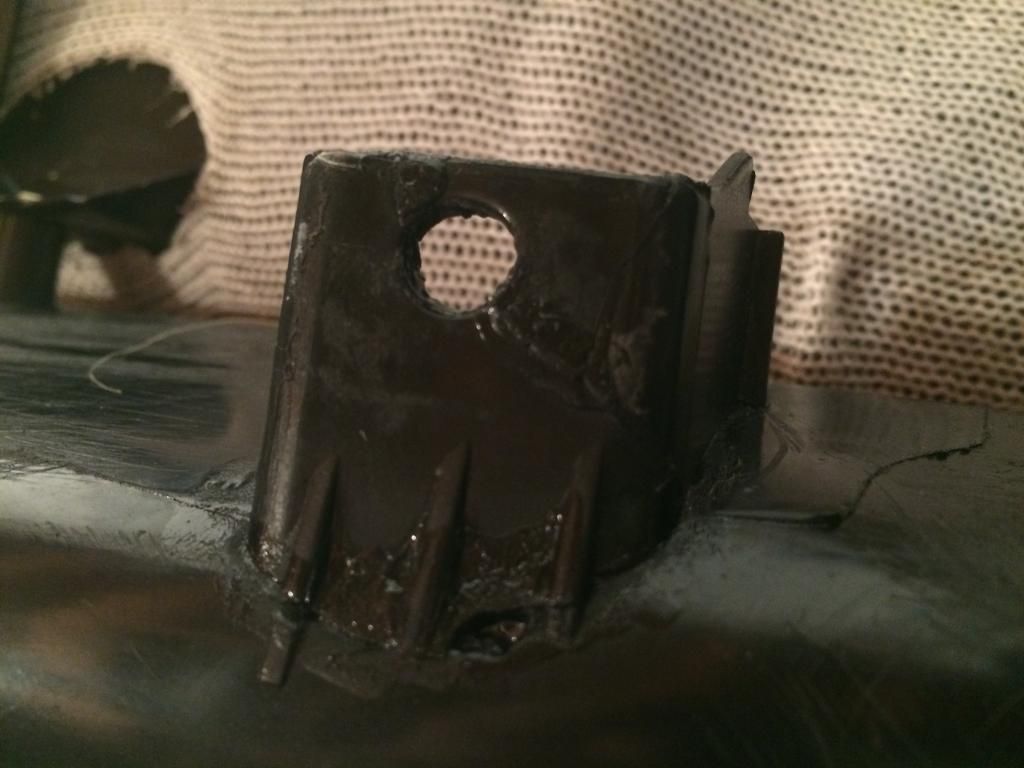
Once the mounting tabs are in place and everything is dry, you can move on to the fiberglass. You’ll want to use coarse sandpaper to rough up the areas you intend to fiberglass. This promotes adhesion. I didn’t sand the mounting tabs though, as they were too delicate. As seen in the pics, in addition to fiberglassing the dash structure and around the mounting tabs, I fiberglassed the mounting tabs themselves. The fronts, the sides, and the bottoms. The result is an extremely strong tab that will outlast the car. However, once the resin sets you’ll have to sand down and smooth out the mounting tabs. A dremel with a sanding wheel attachment works well for this. You’ll have to drill a hole in each tab for where the bolt goes through since fiberglass now covers the hole. Once you’ve smoothed out the tabs, make sure you test-fit the screw brackets that slide on to the tabs. You want to make sure the brackets fit firmly and the screw holes of the brackets lines up with the holes of the mounting tabs.
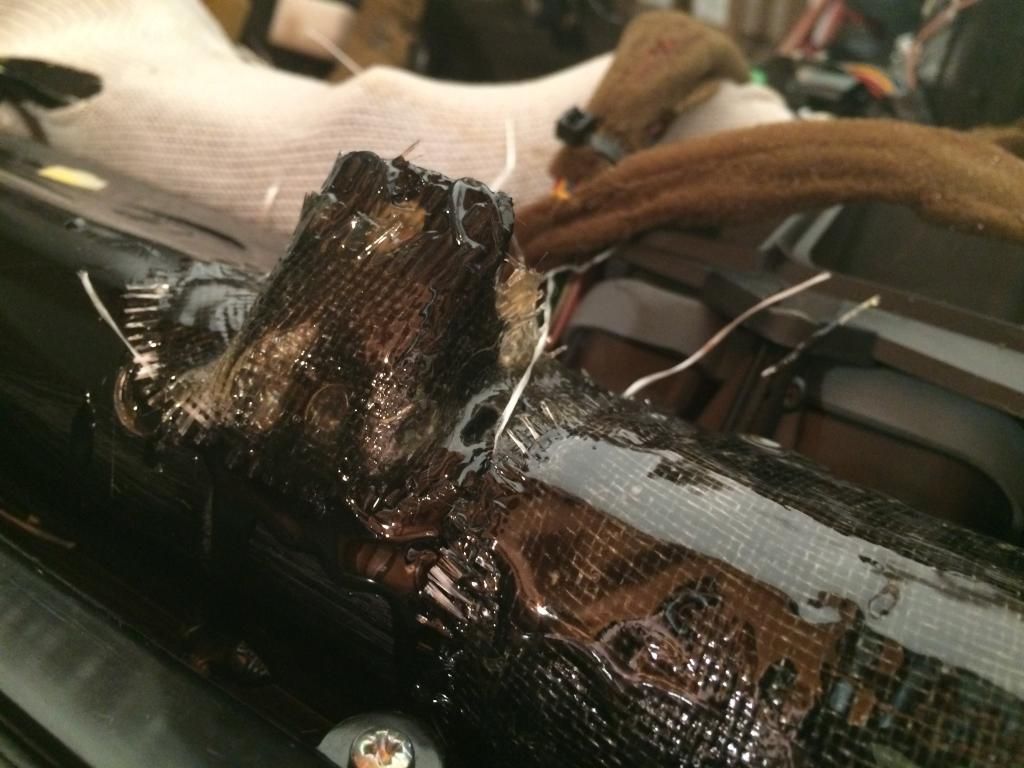

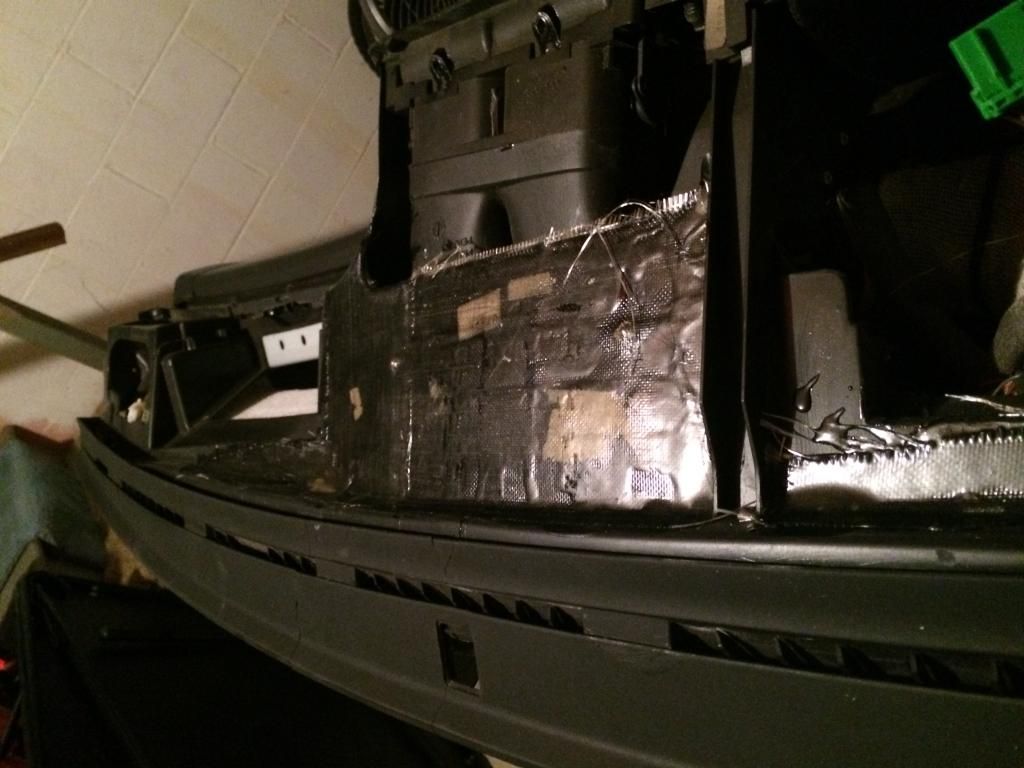
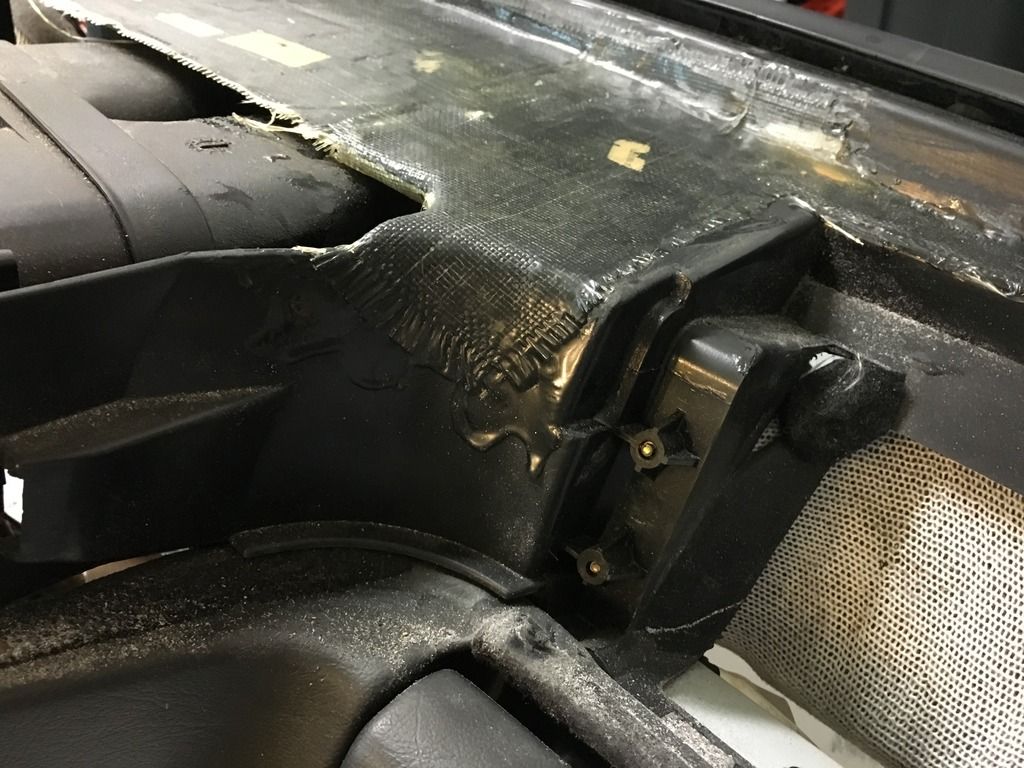
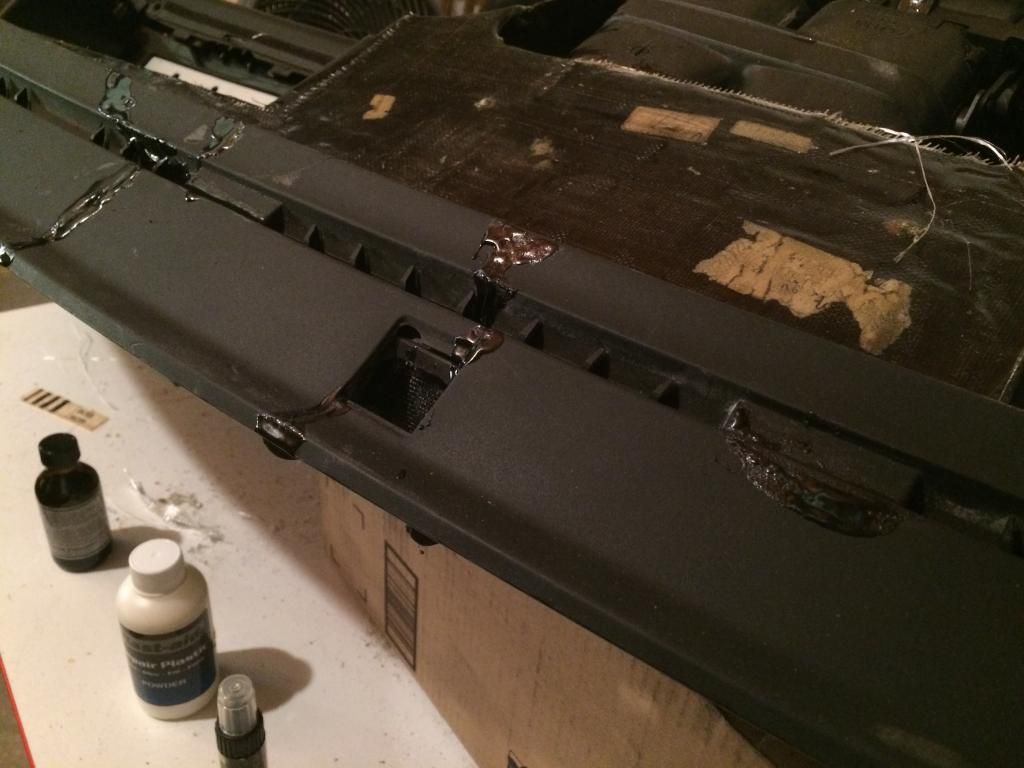
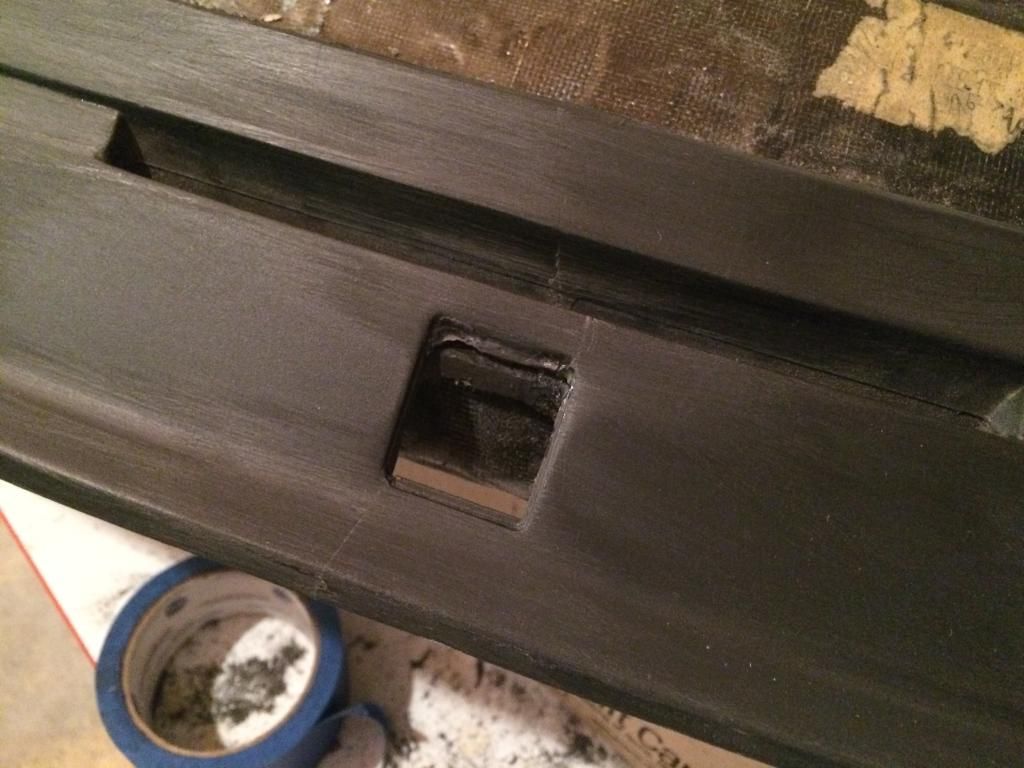
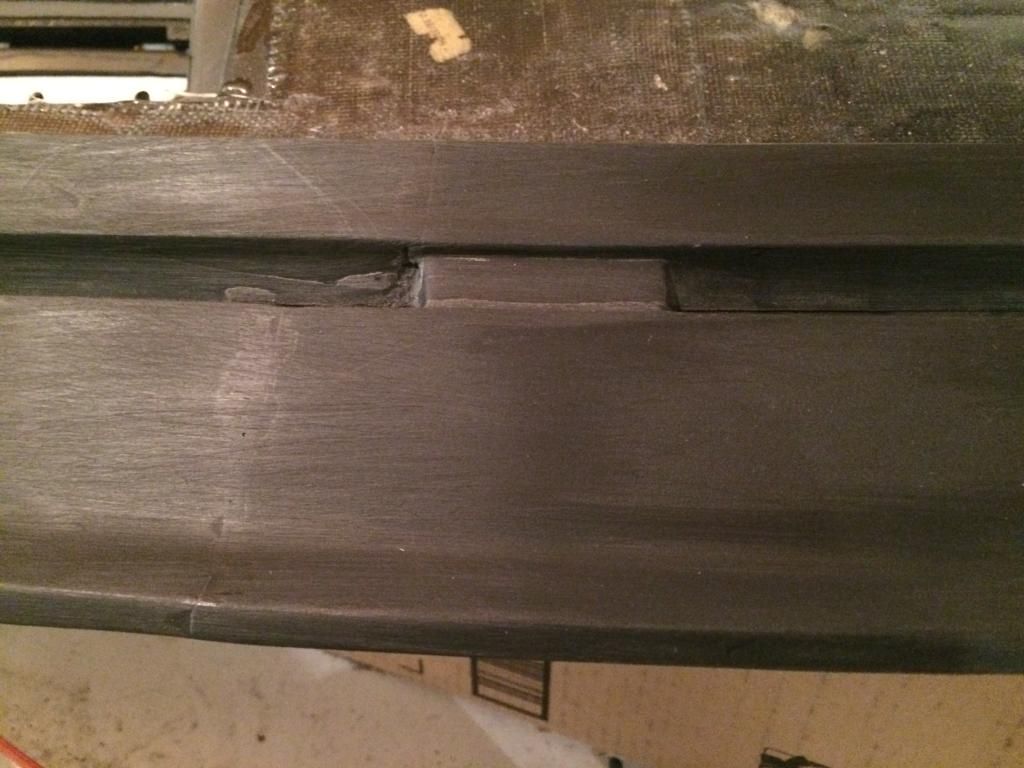
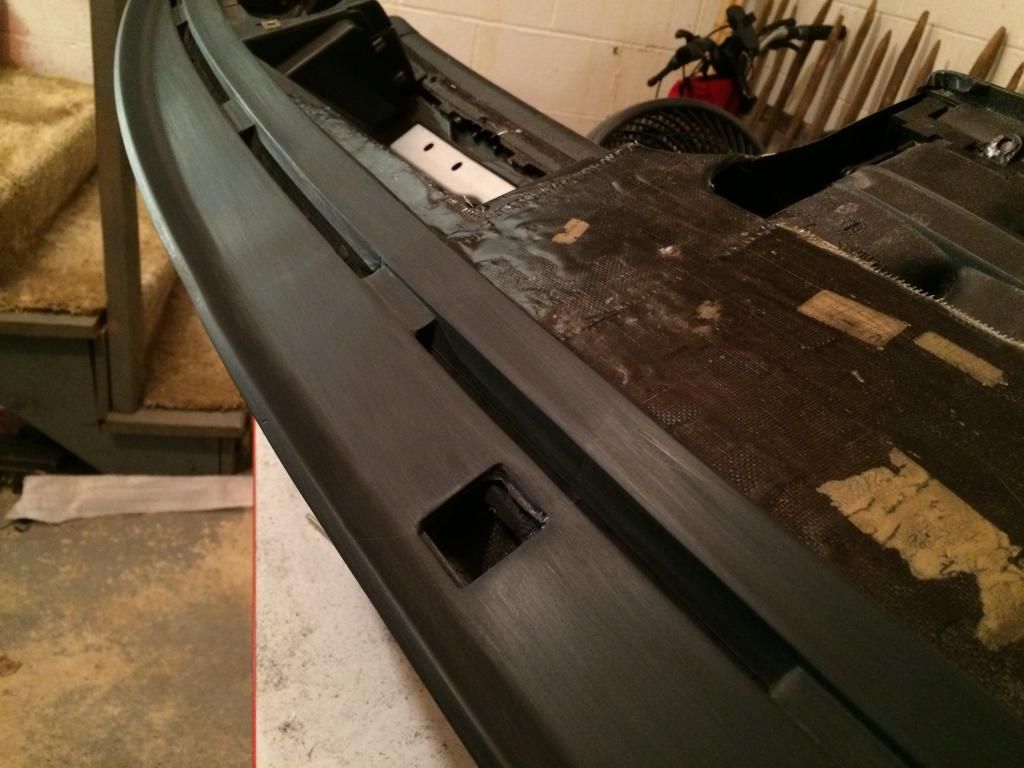
Other areas you should reinforce include all of the mounting points between the dashboard and upper dash pad. I did not use fiberglass on these areas due to the shape of the mounting point, and also because I was concerned about adding too much thickness. If the reinforcement on the mounting point is too thick, you will end up with a gap between the dashboard and upper dash pad. You could use JB weld or other epoxy, but I used a product called plast-aid. Available on amazon. It’s the best plastic repair product I’ve tried – and I’ve tried many different products. I also used plast-aid to repair the upper dash plastic piece by the windshield – more on that below. Pics of the repair:

Now, this last part is optional. I tried to repair the upper plastic part of the dash that sits against the windshield. I used plast-aid, which worked awesome. It was a huge amount of work, and you have to be very careful because the plastic is so thin and delicate. Unfortunately, it ended up being a huge waste of time, but I’ll get to that in a bit. My goal was to repair all of the cracks and holes in the plastic and end up with a smooth part that looked new. I almost did it. You can see my progress in the pics. It was looking pretty good… Obviously, the first step is super gluing any pieces that cracked off
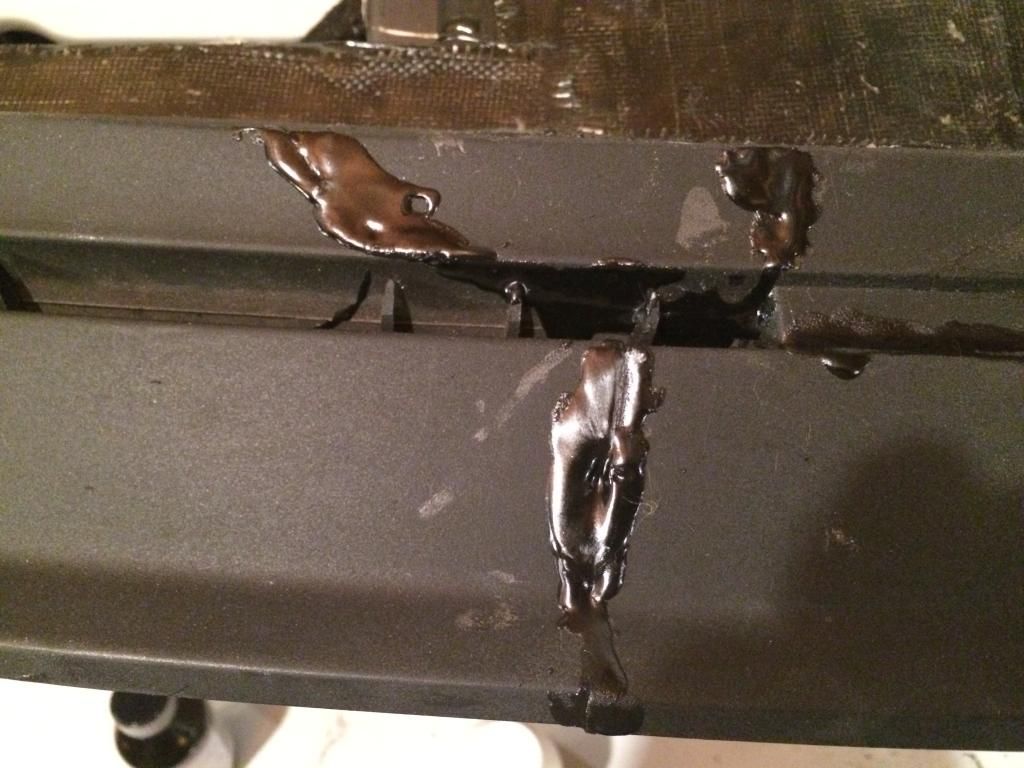

Now to the bad part :( . I sprayed the plastic piece with a coat of black SEM interior paint. For some reason, the repaired portions of the plastic stood out like a sore thumb. My next idea was to try and cover up these imperfections with some textured paint. So I sanded the area down, and sprayed the plastic with some rustoleum black textured paint. As soon as the paint hit the plastic, I heard loud cracks, looked down, and saw that some of the thinner cracking I had repaired was now re-cracked!!! I don’t know if there was a chemical reaction between the paint and plast-aid, or if the cold aerosol spray reacted with the plastic, or what, but the point is, it cracked. At that point, I was completely fed up with the repair, and decided to give up and simply use the extra dash cover trim plate I had purchased in a VS group buy a while ago. Maybe the result would have been different if I hand-painted the piece, but I guess we won’t know unless someone else tries it.
Thanks for looking.
-
16
-
5 hours ago, venderbroeck said:
Does anyone here know how about import duty regulations for the US?
I'm wondering if, and how much import duty one would have to pay to get all of the defloaters imported into the USA in one box.
It's probably dependent on the value entered on shipping.
I want to buy ensurance on the shipping, so I think I have to state the value of the package truthfully for it to be covered properly.In my experience, the recipient of the package has to pay an import fee/tax based on the value of the package. Usually when shipping or receiving over-seas packages, it's best to state that the item is a gift and provide a low value in order to keep the tax low.
-
So basically, if we do not have COP compatibility, the defloater can be disabled with an on/off switch. If we have COP compatibility, the defloater cannot be disabled without unplugging it from the IAC.
If that's the case, I'd like my defloater to be COP compatible, just in case I decide to change things up in the future :)
-
2
-
-
What's the downside of having a switchable unit that works with COP? Just wondering why you don't make all of the units switchable by default
-
1
-


1998 V70 Xc From The Beginning... to the End
in Show Room
Posted
Love your drawings. This is cool.